Linux
Linux related stuff
- AppImage
- Arch Linux, Gnome-Keyring and 1Password
- Bandwidth monitoring
- btrfs
- dnsdist DNS proxy
- Fancy console
- FreeRADIUS
- ImageMagick
- Installation and Setup
- iptables / ipsets
- Linux Performance Observability
- Microsoft Surface Laptop 2 Touchscreen on Linux
- NUT - Network UPS Tools
- SSH load key error in libcrypto
- Supermicro fan control
- Sway
- Ubuntu console-setup for setting console font
- Ubuntu desktop launchers
- Ubuntu unattended upgrades
- Useful system commands
- VBAN for Linux
- Wayland
AppImage
What is AppImage
"Download an application, make it executable, and run! No need to install. No system libraries or system preferences are altered. Can also run in a sandbox like Firejail"
System Prep
Ubuntu 22.04 / 24.04
AppImage expects libfuse2. Ubuntu by default installed libfuse3.
apt install libfuse2Applications
Helix Editor
The script below downloads the 0.10.1 version appimage of nvim and places files where they need to be. Make sure you run this as root as most of the commands need to be elevated.
The script below will only work for x64 version of linux. Currently there is no nvim appimage support for arm64.
ReleaseURL="https://github.com/helix-editor/helix/releases/download/25.01.1/helix-25.01.1-x86_64.AppImage" &&
OUTFILE="helix-25.01.1-x86_64.AppImage" &&
wget $ReleaseURL -O $OUTFILE &&
chmod 755 $OUTFILE &&
./$OUTFILE --appimage-extract &&
chown -R root:root $OUTFILE squashfs-root &&
cp squashfs-root/usr/share/applications/Helix.desktop /usr/share/applications/ &&
cp squashfs-root/helix.png /usr/share/icons/ &&
rm -rf squashfs-root &&
mkdir -p /usr/local/bin &&
cp $OUTFILE /usr/local/bin/ &&
ln -s /usr/local/bin/$OUTFILE /usr/local/bin/helix.appimage &&
ln -s /usr/local/bin/$OUTFILE /usr/local/bin/hx &&
ls -l /usr/local/bin/hx* /usr/share/applications/Helix.desktop /usr/share/icons/helix.png
Neovim / nvim
The script below downloads the 0.10.1 version appimage of nvim and places files where they need to be. Make sure you run this as root as most of the commands need to be elevated.
The script below will only work for x64 version of linux. Currently there is no nvim appimage support for arm64.
NVIMURL="https://github.com/neovim/neovim/releases/download/v0.10.1/nvim.appimage" &&
OUTFILE="nvim.0.10.1.appimage" &&
wget $NVIMURL -O $OUTFILE &&
chmod 755 $OUTFILE &&
./$OUTFILE --appimage-extract &&
chown -R root:root $OUTFILE squashfs-root &&
cp squashfs-root/usr/share/applications/nvim.desktop /usr/share/applications/nvim.desktop &&
cp squashfs-root/nvim.png /usr/share/icons/ &&
rm -rf squashfs-root &&
mkdir -p /usr/local/bin &&
cp $OUTFILE /usr/local/bin/ &&
ln -s /usr/local/bin/nvim.0.10.1.appimage /usr/local/bin/nvim.appimage &&
ln -s /usr/local/bin/nvim.appimage /usr/local/bin/nvim &&
ls -l /usr/local/bin/nvim* /usr/share/applications/nvim.desktop /usr/share/icons/nvim.png
-end
Arch Linux, Gnome-Keyring and 1Password
I've been playing with Garuda Sway linux recently because I like their Sway/SwayFX configuration and layout. The "downside" is that I've had to learn the ins and outs of an Arch Linux based distribution.
1Password will not work "properly" out of the box. When you enter your OTP codes, you will see the message "1password was unable to save your two-factor token" at the bottom of the screen. The changes below will fix the glitch.
Needed changes
- Configure PAM as shown below.
- Logout.
- Login.
- Create a gnome-keyring and set it as default. This can easily be done with seahorse, as referenced in the source link above.
- Run seahorse
- Create a new Password keyring
- Set the new Password keyring as default
- Re-open 1Password and enter the requested authentication tokens. It will now be able to save the authentication tokens to the gnome-keyring
Configure PAM
File: /etc/pam.d/login
#%PAM-1.0

auth       requisite    pam_nologin.so
auth       include      system-local-login
auth       optional     pam_gnome_keyring.so
account    include      system-local-login
session    include      system-local-login
session    optional     pam_gnome_keyring.so auto_start
password   include      system-local-login
File: /etc/pam.d/greetd
#%PAM-1.0

auth       required     pam_securetty.so
auth       requisite    pam_nologin.so
auth       include      system-local-login
auth       optional     pam_gnome_keyring.so
account    include      system-local-login
session    include      system-local-login
session    optional     pam_gnome_keyring.so auto_start
Bandwidth monitoring
Useful console programs
- bwm-ng - Bandwidth Monitor NG (Next Generation), a live bandwidth monitor for network and disk io
- iftop - display bandwidth usage on an interface by host
- nethogs - Net top tool grouping bandwidth per process
- nload - displays the current network usage
To install them all:
sudo apt install bwm-ng iftop nethogs nloadUseful gui programs
btrfs
Example of creating and mounting multiple sub-volumes
mkfs.vfat /dev/sda1
mkfs.btrfs /dev/sda2 -f
mkswap /dev/sda3

mkdir /mnt-btrfs
mount /dev/sda2 /mnt-btrfs
btrfs subvolume create /mnt-btrfs/@
btrfs subvolume create /mnt-btrfs/@home
btrfs subvolume create /mnt-btrfs/@root
btrfs subvolume create /mnt-btrfs/@srv
btrfs subvolume create /mnt-btrfs/@varcache
btrfs subvolume create /mnt-btrfs/@varlog
btrfs subvolume create /mnt-btrfs/@vartmp

mkdir -p /mnt/boot/efi
mkdir -p /mnt/home
mkdir -p /mnt/root
mkdir -p /mnt/var/cache
mkdir -p /mnt/var/log
mkdir -p /mnt/var/tmp
mkdir -p /mnt/srv

mount -o compress=zstd -o subvol=/@          /dev/sda2 /mnt/
mount -o compress=zstd -o subvol=/@home      /dev/sda2 /mnt/home
mount -o compress=zstd -o subvol=/@root      /dev/sda2 /mnt/root
mount -o compress=zstd -o subvol=/@srv       /dev/sda2 /mnt/var/srv
mount -o compress=zstd -o subvol=/@varcache  /dev/sda2 /mnt/var/cache
mount -o compress=zstd -o subvol=/@varlog    /dev/sda2 /mnt/var/log
mount -o compress=zstd -o subvol=/@vartmp    /dev/sda2 /mnt/var/tmp
dnsdist DNS proxy
dnsdist is a highly configurable DNS-, DoS- and abuse-aware loadbalancer.
Here's an example configuration file:
-- File: /etc/dnsdist/dnsdist.conf

-- listen for console connection with the given secret key
controlSocket("0.0.0.0:53530")
setKey("supersecretAPIkey")
setConsoleACL({"172.16.16.0/24","192.168.168.0/24","10.10.20.0/24"})

-- start and configure the web server
webserver("0.0.0.0:8053")
setWebserverConfig({password="supersecretpassword", apiKey="supersecretAPIkey"}, acl="172.16.16.0/24,192.168.168.0/24,10.10.20.0/24")

-- accept DNS queries on UDP/53 and TCP/53
addLocal("0.0.0.0:53")
-- accept DNS queries on UDP/5200 and TCP/5200
-- addLocal("0.0.0.0:5200")

-- fix up possibly badly truncated answers from pdns 2.9.22
truncateTC(true)

-- Log message
warnlog(string.format("Script starting %s", "up!"))

-- define the server pools
-- public-google
newServer({address="8.8.8.8", pool="public-google", checkInterval=300})
newServer({address="8.8.4.4", pool="public-google", checkInterval=300})

-- public-cloudflare
newServer({address="1.1.1.1", pool="public-cloudflare", checkInterval=300})

-- public-quad9
newServer({address="9.9.9.9", pool="public-quad9", checkInterval=300})
newServer({address="149.112.112.112", pool="public-quad9", checkInterval=300})

-- internal pools
newServer({address="192.168.1.53",  pool="company1-auth", checkInterval=300})
newServer({address="192.168.2.53",  pool="company2-auth", checkInterval=300})
newServer({address="192.168.3.53",  pool="company3-auth", checkInterval=300})

-- local router
newServer({address="172.16.16.254", pool="router", checkInterval=300})

newServer({address="127.0.0.1:53531", pool="nodeapp1", checkInterval=300})

-- switch the server balancing policy to round robin,
-- the default being least outstanding queries
setServerPolicy(roundrobin)

addAction({"camera.project1.loc.", "device.project1.loc."}, PoolAction("nodeapp1"))
addAction({"company1.loc"}, PoolAction("company1-auth"))
addAction({"company2.loc"}, PoolAction("company2-auth"))
addAction({"company3.loc"}, PoolAction("company3-auth"))

addAction(AllRule(), PoolAction("public-google"))
-- addAction(AllRule(), PoolAction("public-cloudflare"))
-- addAction(AllRule(), PoolAction("public-quad9"))
-- addAction(AllRule(), PoolAction("router"))

-- refuse all queries not having exactly one question
-- addAction(NotRule(RecordsCountRule(DNSSection.Question, 1, 1)), RCodeAction(DNSRCode.REFUSED))

-- return 'refused' for domains matching the regex evil[0-9]{4,}.powerdns.com$
-- addAction(RegexRule("evil[0-9]{4,}\\.powerdns\\.com$"), RCodeAction(DNSRCode.REFUSED))

-- spoof responses for A, AAAA and ANY for spoof.powerdns.com.
-- A queries will get 192.0.2.1, AAAA 2001:DB8::1 and ANY both
-- addAction("spoof.powerdns.com.", SpoofAction({"192.0.2.1", "2001:DB8::1"}))

-- spoof responses will multiple records
-- A will get 192.0.2.1 and 192.0.2.2, AAAA 20B8::1 and 2001:DB8::2
-- ANY all of that
-- addAction("spoof.powerdns.com", SpoofAction({"192.0.2.1", "192.0.2.2", "20B8::1", "2001:DB8::2"}))

-- spoof responses with a CNAME
-- addAction("cnamespoof.powerdns.com.", SpoofCNAMEAction("cname.powerdns.com."))

-- spoof responses in Lua
--[[
    function spoof1rule(dq)
        if(dq.qtype==1) -- A
        then
                return DNSAction.Spoof, "192.0.2.1"
        elseif(dq.qtype == 28) -- AAAA
        then
                return DNSAction.Spoof, "2001:DB8::1"
        else
                return DNSAction.None, ""
        end
    end
    function spoof2rule(dq)
        return DNSAction.Spoof, "spoofed.powerdns.com."
    end
    addAction("luaspoof1.powerdns.com.", LuaAction(spoof1rule))
    addAction("luaspoof2.powerdns.com.", LuaAction(spoof2rule))

--]]

-- alter a protobuf response for anonymization purposes
--[[
function alterProtobuf(dq, protobuf)
    requestor = newCA(dq.remoteaddr:toString())
    if requestor:isIPv4() then
        requestor:truncate(24)
    else
        requestor:truncate(56)
    end
    protobuf:setRequestor(requestor)
end

rl = newRemoteLogger("127.0.0.1:4242")
addAction(AllRule(), RemoteLogAction(rl, alterProtobuf))
--]]
-end
Fancy console
Components
- bash
- Nerd Fonts
- starship
- preset: Pastel Powerline Preset
- customize: see below
- tmux
- tmux plugin manager
- bacula theme with top bar formatting
- bat - a cat clone with wings (syntax highlighting +++)
Install Nerd Fonts
Here's an installer for Linux. Install at least Hack and JetBrains.
bash -c "$(curl -fsSL https://raw.githubusercontent.com/officialrajdeepsingh/nerd-fonts-installer/main/install.sh)"The script installs to the local user .fonts directory. It can be beneficial to move those fonts to the system local folder.
sudo mv ~/.fonts/* /usr/local/share/fonts/
sudo fc-cache -fv
Update terminal config to use the Nerd Font
# ~/.config/foot/foot.ini
font=Hack Nerd Font:size=10
Starship
Install Starship
curl -sS https://starship.rs/install.sh | shConfigure shell to run it
# for BASH
cat <<EOF > ~/.bashrc
eval "$(starship init bash)"
EOF
# for FISH
cat <<EOF > ~/.config/fish/config.fish
starship init fish | source
EOF# for PowerShell
# Add the following to the end of your PowerShell configuration (find it by running $PROFILE):
Invoke-Expression (&starship init powershell)# for Xonsh
cat <<EOF > ~/.xonshrc
execx($(starship init xonsh))
EOF# for
cat <<EOF > ~/
EOFConfigure to use preset
Make it pretty!
starship preset pastel-powerline -o ~/.config/starship.tomlCustomize the preset
Adding the hostname to the prompt by editing the file ~/.config/starship.toml
# Add the $hostname\ line near the beginning of the file:
# $username\
# $hostname\
#

cat <<EOF >> ~/.config/starship.toml

[hostname]
ssh_only = false
style = "bg:#9A348E"
format = '[@ $hostname ]($style)'
trim_at = '.'
disabled = false
EOF
tmux configuration
The configuration below includes:
- tmux plugin manager
- dracula theme with top bar formatting
sudo apt install tmuxmkdir ~/.config/tmux
cat <<EOF > ~/.config/tmux/tmux.conf
#improve colors
set -g default-terminal 'screen-256color'
# act like vim
setw -g mode-keys vi
bind-key h select-pane -L
bind-key j select-pane -D
bind-key k select-pane -U
bind-key l select-pane -R
bind-key -r C-h select-window -t :-
bind-key -r C-l select-window -t :+
# change prefix key because this is easier to hit
set -g prefix2 C-s
# reload config
unbind r
bind r source-file ~/.config/tmux/tmux.conf
# List of plugins
set -g @plugin 'tmux-plugins/tpm'
set -g @plugin 'tmux-plugins/tmux-sensible'
set -g @plugin 'dracula/tmux'
set -g @dracula-show-powerline true
set -g @dracula-fixed-location "Baton Rouge"
set -g @dracula-plugins "weather"
set -g @dracula-show-flags true
set -g @dracula-show-left-icon session
set -g status-position top
# Other examples:
# set -g @plugin 'github_username/plugin_name'
# set -g @plugin 'github_username/plugin_name#branch'
# set -g @plugin 'git@github.com:user/plugin'
# set -g @plugin 'git@bitbucket.com:user/plugin'
# Initialize TMUX plugin manager (keep this line at the very bottom of tmux.conf)
run '~/.tmux/plugins/tpm/tpm'EOFbat / batcat
I keep forgetting about this tool.
https://github.com/sharkdp/bat
Pastel Powerline Modified Preset
cat <<EOF > ~/.config/starship.toml
# MSHARP 20240926
# Slightly modified from the Pastel Powerline Preset
# Adds the $hostname
format = """
[](#9A348E)\
$os\
$username\
$hostname\
[](bg:#DA627D fg:#9A348E)\
$directory\
[](fg:#DA627D bg:#FCA17D)\
$git_branch\
$git_status\
[](fg:#FCA17D bg:#86BBD8)\
$c\
$elixir\
$elm\
$golang\
$gradle\
$haskell\
$java\
$julia\
$nodejs\
$nim\
$rust\
$scala\
[](fg:#86BBD8 bg:#06969A)\
$docker_context\
[](fg:#06969A bg:#33658A)\
$time\
[ ](fg:#33658A)\
"""
# Disable the blank line at the start of the prompt
# add_newline = false
# You can also replace your username with a neat symbol like or disable this
# and use the os module below
[username]
show_always = true
style_user = "bg:#9A348E"
style_root = "bg:#9A348E"
format = '[$user ]($style)'
disabled = false
# An alternative to the username module which displays a symbol that
# represents the current operating system
[os]
style = "bg:#9A348E"
disabled = true # Disabled by default
[directory]
style = "bg:#DA627D"
format = "[ $path ]($style)"
truncation_length = 3
truncation_symbol = "…/"
# Here is how you can shorten some long paths by text replacement
# similar to mapped_locations in Oh My Posh:
[directory.substitutions]
"Documents" = " "
"Downloads" = " "
"Music" = " "
"Pictures" = " "
# Keep in mind that the order matters. For example:
# "Important Documents" = " "
# will not be replaced, because "Documents" was already substituted before.
# So either put "Important Documents" before "Documents" or use the substituted version:
# "Important " = " "
[c]
symbol = " "
style = "bg:#86BBD8"
format = '[ $symbol ($version) ]($style)'
[docker_context]
symbol = " "
style = "bg:#06969A"
format = '[ $symbol $context ]($style)'
[elixir]
symbol = " "
style = "bg:#86BBD8"
format = '[ $symbol ($version) ]($style)'
[elm]
symbol = " "
style = "bg:#86BBD8"
format = '[ $symbol ($version) ]($style)'
[git_branch]
symbol = ""
style = "bg:#FCA17D"
format = '[ $symbol $branch ]($style)'
[git_status]
style = "bg:#FCA17D"
format = '[$all_status$ahead_behind ]($style)'
[golang]
symbol = " "
style = "bg:#86BBD8"
format = '[ $symbol ($version) ]($style)'
[gradle]
style = "bg:#86BBD8"
format = '[ $symbol ($version) ]($style)'
[haskell]
symbol = " "
style = "bg:#86BBD8"
format = '[ $symbol ($version) ]($style)'
[java]
symbol = " "
style = "bg:#86BBD8"
format = '[ $symbol ($version) ]($style)'
[julia]
symbol = " "
style = "bg:#86BBD8"
format = '[ $symbol ($version) ]($style)'
[nodejs]
symbol = ""
style = "bg:#86BBD8"
format = '[ $symbol ($version) ]($style)'
[nim]
symbol = " "
style = "bg:#86BBD8"
format = '[ $symbol ($version) ]($style)'
[rust]
symbol = ""
style = "bg:#86BBD8"
format = '[ $symbol ($version) ]($style)'
[scala]
symbol = " "
style = "bg:#86BBD8"
format = '[ $symbol ($version) ]($style)'
[time]
disabled = false
time_format = "%R" # Hour:Minute Format
style = "bg:#33658A"
format = '[ ♥ $time ]($style)'
[hostname]
ssh_only = false
style = "bg:#9A348E"
format = '[@ $hostname ]($style)'
trim_at = '.'
disabled = false
EOF-end
FreeRADIUS
--- freeradius-original-no-comments/3.0/radiusd.conf
# correct_escapes = true may or may not be needed

-	auth = no
+	auth = yes
 	auth_badpass = no
 	auth_goodpass = no
+	msg_goodpass = "msg_goodpass: nas: %{NAS-IP-Address}"
+	msg_badpass = "msg_badpass: nas: %{NAS-IP-Address}"


--- freeradius-original-no-comments/3.0/users
 DEFAULT	Hint == "SLIP"
 	Framed-Protocol = SLIP
+DEFAULT
+	Message-Authenticator = 0


--- freeradius-original-no-comments/3.0/mods-config/files/authorize
 	Framed-Compression = Van-Jacobson-TCP-IP
 DEFAULT	Hint == "SLIP"
 	Framed-Protocol = SLIP
+DEFAULT
+	Message-Authenticator = 0


--- freeradius-original-no-comments/3.0/sites-enabled/inner-tunnel
# change all -sql to sql
Message-Authenticator and Mikrotik
As of RouterOS version 7.15 changelog, Mikrotik introduced the following two changes:
*) radius - added "require-message-auth" option that requires "Message-Authenticator" in received Access-Accept/Challenge/Reject messages;
*) radius - include "Message-Authenticator" in any RADIUS communication messages besides accounting for all services;
When you upgrade from a previous version, currently Mikrotik sets the require-message-auth=yes instead of no. This means that if you're running FreeRADIUS, most likely you won't be able to login to your routers anymore using RADIUS authentciation. I hope you know what the local credentials are!
It's taken much too long to learn how to get FreeRADIUS to add the Message-Authenticator attribute in response messages.
# Ubuntu 22.04 - /etc/freeradius/3.0/mods-config/files/authorize
# Add the following to the end of the file, and make sure you're not breaking anything else in the process
DEFAULT
        Message-Authenticator = 0
Using environment variables with Docker
This is an example of using the string String Expansion Alternation syntax with environment variables. If the environment variable doesn't exist, it will return the value sqlite instead.
sql {
	dialect = "%{$ENV{RADIUSD_SQL_DIALECT}:-sqlite}"
	driver = "rlm_sql_${dialect}"
Here's another example:
# a bunch of random examples so you get the idea
type = %{$ENV{RADIUSD_SERVER_DEFAULT_TYPE}:-auth}
private_key_password = %{$ENV{RADIUSD_MOD_EAP_TLS_PRIVATE_KEY_PASSWORD}:-YouReallyNeedThisEnvVariable}
private_key_file = %{$ENV{RADIUSD_MOD_EAP_TLS_PRIVATE_KEY_FILE}:-/opt/freeradius/certs/server.key}
certificate_file = %{$ENV{RADIUSD_MOD_EAP_TLS_CERTIFICATE_FILE}:-/opt/freeradius/certs/server.crt}
tls_min_version = "%{$ENV{RADIUSD_MOD_EAP_TLS_MIN_VERSION}:-1.2}"
tls_max_version = "%{$ENV{RADIUSD_MOD_EAP_TLS_MAX_VERSION}:-1.2}"
enable = %{$ENV{RADIUSD_MOD_EAP_TLS_OCSP_ENABLE}:-no}
override_cert_url = %{$ENV{RADIUSD_MOD_EAP_TLS_OCSP_OVERRIDE_CERT_URL}:-no}
Configs
Environment setup
mkdir -p /opt/freeradius/certs
mkdir -p /opt/freeradius/certs/trusted
mkdir -p /opt/freeradius/db
mkdir -p /opt/freeradius/tmp
chown -R freerad:freerad /opt/freeradius
find /opt/freeradius -type d -exec chmod 770 {} \;
All files that need updating
radiusd.conf
clients.conf
users
mods-config/files/authorize
mods-enabled/linelog
mods-enabled/python3
mods-enabled/sql
mods-enabled/eap
sites-enabled/default
sites-enabled/inner-tunnel
Base changes
--- freeradius-original-no-comments/3.0/radiusd.conf
# correct_escapes = true may or may not be needed

-	auth = no
+	auth = yes
 	auth_badpass = no
 	auth_goodpass = no
+	msg_goodpass = "msg_goodpass: nas: %{NAS-IP-Address}"
+	msg_badpass = "msg_badpass: nas: %{NAS-IP-Address}"
--- freeradius-original-no-comments/3.0/users
DEFAULT Hint == "SLIP"
Framed-Protocol = SLIP
+DEFAULT
+ Message-Authenticator = 0--- freeradius-original-no-comments/3.0/mods-config/files/authorize
Framed-Compression = Van-Jacobson-TCP-IP
DEFAULT Hint == "SLIP"
Framed-Protocol = SLIP
+DEFAULT
+ Message-Authenticator = 0--- freeradius-original-no-comments/3.0/sites-enabled/inner-tunnel
# change all -sql to sql--- freeradius-original-no-comments/3.0/sites-enabled/default
# change all -sql to sql, and a number of other items as needed
#
@@ -1,6 +1,6 @@
server default {
listen {
- type = auth
+ type = auth+acct
ipaddr = *
port = 0
limit {
@@ -34,8 +34,10 @@
}
}
authorize {
+ linelog_recv_request
filter_username
preprocess
+ auth_log
chap
mschap
digest
@@ -44,7 +46,7 @@
ok = return
}
files
- -sql
+ sql
-ldap
expiration
logintime
@@ -75,12 +77,12 @@
}
accounting {
detail
- unix
- -sql
+ sql
exec
attr_filter.accounting_response
}
session {
+ sql
}
post-auth {
if (session-state:User-Name && reply:User-Name && request:User-Name && (reply:User-Name == request:User-Name)) {
@@ -91,12 +93,16 @@
update {
&reply: += &session-state:
}
- -sql
+ sql_session_start
+ reply_log
+ linelog_send_accept
+ sql
exec
remove_reply_message_if_eap
Post-Auth-Type REJECT {
- -sql
+ sql
attr_filter.access_reject
+ linelog_send_reject
eap
remove_reply_message_if_eap
}
@@ -111,8 +117,12 @@
}
}
pre-proxy {
+ linelog_send_proxy_request
+ pre_proxy_log
}
post-proxy {
+ linelog_recv_proxy_response
+ post_proxy_log
eap
}
}# file: mods-available/linelog
#
# Added based on this URL:
# https://wiki.freeradius.org/guide/eduroam
linelog linelog_recv_request {
filename = syslog
syslog_facility = local0
syslog_severity = debug
format = '{"action":"Recv-Request", "User-Name":"%{User-Name}", "Called-Station-Id":"%{Called-Station-Id}", "EAP-Type":"%{EAP-Type}", "NAS-IP-Address":"%{NAS-IP-Address}", "Calling-Station-Id":"%{Calling-Station-Id}", "Message-Authenticator":"%{Message-Authenticator}", "NAS-Port-Type":"%{NAS-Port-Type}", "NAS-Port-Id":"%{NAS-Port-Id}", "TLS-Client-Cert-Subject-Alt-Name-Dns":"%{TLS-Client-Cert-Subject-Alt-Name-Dns}", "TLS-Client-Cert-Serial":"%{TLS-Client-Cert-Serial}", "TLS-Client-Cert-Issuer":"%{TLS-Client-Cert-Issuer}"}'
}
linelog linelog_send_accept {
filename = syslog
syslog_facility = local0
syslog_severity = info
format = '{"action":"Send-Accept", "User-Name":"%{User-Name}", "Called-Station-Id":"%{Called-Station-Id}", "EAP-Type":"%{EAP-Type}", "NAS-IP-Address":"%{NAS-IP-Address}", "Calling-Station-Id":"%{Calling-Station-Id}", "Message-Authenticator":"%{Message-Authenticator}", "NAS-Port-Type":"%{NAS-Port-Type}", "NAS-Port-Id":"%{NAS-Port-Id}", "TLS-Client-Cert-Subject-Alt-Name-Dns":"%{TLS-Client-Cert-Subject-Alt-Name-Dns}", "TLS-Client-Cert-Serial":"%{TLS-Client-Cert-Serial}", "TLS-Client-Cert-Issuer":"%{TLS-Client-Cert-Issuer}"}'
}
linelog linelog_send_reject {
filename = syslog
syslog_facility = local0
syslog_severity = error
format = '{"action":"Send-Reject", "User-Name":"%{User-Name}", "Called-Station-Id":"%{Called-Station-Id}", "EAP-Type":"%{EAP-Type}", "NAS-IP-Address":"%{NAS-IP-Address}", "Calling-Station-Id":"%{Calling-Station-Id}", "Message-Authenticator":"%{Message-Authenticator}", "NAS-Port-Type":"%{NAS-Port-Type}", "NAS-Port-Id":"%{NAS-Port-Id}", "TLS-Client-Cert-Subject-Alt-Name-Dns":"%{TLS-Client-Cert-Subject-Alt-Name-Dns}", "TLS-Client-Cert-Serial":"%{TLS-Client-Cert-Serial}", "TLS-Client-Cert-Issuer":"%{TLS-Client-Cert-Issuer}"}'
}
linelog linelog_send_proxy_request {
filename = syslog
syslog_facility = local0
syslog_severity = debug
format = "action = Send-Proxy-Request, %{pairs:proxy-request:}"
}
linelog linelog_recv_proxy_response {
filename = syslog syslog_facility = local0 syslog_severity = debug
reference = "messages.%{proxy-reply:Response-Packet-Type}"
messages {
Access-Accept = "action = Recv-Proxy-Accept, User-Name = %{User-Name}, Calling-Station-Id = %{Calling-Station-Id}, %{pairs:proxy-reply:}"
Access-Reject = "action = Recv-Proxy-Reject, User-Name = %{User-Name}, Calling-Station-Id = %{Calling-Station-Id}, %{pairs:proxy-reply:}"
Access-Challenge = "action = Recv-Proxy-Challenge, User-Name = %{User-Name}, Calling-Station-ID = %{Calling-Station-Id}, %{pairs:proxy-reply:}"
}
}Solution specific changes
EAP-TLS
# file: mods-enabled/eap
eap {
    default_eap_type = tls
    timer_expire = 60
    ignore_unknown_eap_types = no
    cisco_accounting_username_bug = no
    max_sessions = ${max_requests}
    tls-config tls-common {
        private_key_file = /opt/freeradius/certs/freerad1.domain.com.key
        certificate_file = /opt/freeradius/certs/freerad1.domain.com.crt
        ca_file = /opt/freeradius/certs/root-ca-certificate.crt
        check_crl = no
        check_all_crl = no
        ca_path = /opt/freeradius/certs/trusted
        ca_path_reload_interval = 3600
        allow_expired_crl = no
        cipher_list = "DEFAULT"
        cipher_server_preference = yes
        tls_min_version = "1.2"
        tls_max_version = "1.2"
        ecdh_curve = ""
        cache {
            enable = no
            lifetime = 24 # hours
            store {
                Tunnel-Private-Group-Id
            }
        }
        verify {
        }
        ocsp {
            enable = no
            override_cert_url = no
            use_nonce = yes
        }
    }
    tls {
        tls = tls-common
    }
}
SQLite
# file: mods-enabled/sql
# note: all other dialect references have been removed
sql {
	dialect = "sqlite"
	driver = "rlm_sql_${dialect}"
	sqlite {
		filename = "/opt/freeradius/db/freeradius.sqlite3"
		busy_timeout = 200
		bootstrap = "${modconfdir}/${..:name}/main/sqlite/schema.sql"
	}
	radius_db = "radius"
	acct_table1 = "radacct"
	acct_table2 = "radacct"
	postauth_table = "radpostauth"
	authcheck_table = "radcheck"
	groupcheck_table = "radgroupcheck"
	authreply_table = "radreply"
	groupreply_table = "radgroupreply"
	usergroup_table = "radusergroup"
	delete_stale_sessions = yes
	pool {
		start = ${thread[pool].start_servers}
		min = ${thread[pool].min_spare_servers}
		max = ${thread[pool].max_servers}
		spare = ${thread[pool].max_spare_servers}
		uses = 0
		retry_delay = 30
		lifetime = 0
		idle_timeout = 60
	}
	client_table = "nas"
	group_attribute = "SQL-Group"
	$INCLUDE ${modconfdir}/${.:name}/main/${dialect}/queries.conf
}
Original Configs
Just for reference... from a system running Ubuntu 24.04.3 freeradius 3.2.5+dfsg-3~ubuntu24.04.3
freeradius/3.0
# file: radiusd.conf
prefix = /usr
exec_prefix = /usr
sysconfdir = /etc
localstatedir = /var
sbindir = ${exec_prefix}/sbin
logdir = /var/log/freeradius
raddbdir = /etc/freeradius/3.0
radacctdir = ${logdir}/radacct
name = freeradius
confdir = ${raddbdir}
modconfdir = ${confdir}/mods-config
certdir = ${confdir}/certs
cadir   = ${confdir}/certs
run_dir = ${localstatedir}/run/${name}
db_dir = ${raddbdir}
libdir = /usr/lib/freeradius
pidfile = ${run_dir}/${name}.pid
max_request_time = 30
cleanup_delay = 5
max_requests = 16384
hostname_lookups = no
log {
	destination = files
	colourise = yes
	file = ${logdir}/radius.log
	syslog_facility = daemon
	stripped_names = no
	auth = no
	auth_badpass = no
	auth_goodpass = no
	msg_denied = "You are already logged in - access denied"
}
checkrad = ${sbindir}/checkrad
ENV {
}
security {
	user = freerad
	group = freerad
	allow_core_dumps = no
	max_attributes = 200
	reject_delay = 1
	status_server = yes
	require_message_authenticator = auto
	limit_proxy_state = auto
}
proxy_requests  = yes
$INCLUDE proxy.conf
$INCLUDE clients.conf
thread pool {
	start_servers = 5
	max_servers = 32
	min_spare_servers = 3
	max_spare_servers = 10
	max_requests_per_server = 0
	auto_limit_acct = no
}
modules {
	$INCLUDE mods-enabled/
}
instantiate {
}
policy {
	$INCLUDE policy.d/
}
$INCLUDE sites-enabled/
# file: clients.conf
client localhost {
ipaddr = 127.0.0.1
proto = *
secret = testing123
nas_type = other # localhost isn't usually a NAS...
limit {
max_connections = 16
lifetime = 0
idle_timeout = 30
}
}
client localhost_ipv6 {
ipv6addr = ::1
secret = testing123
}# file: proxy.conf
proxy server {
default_fallback = no
}
home_server localhost {
type = auth
ipaddr = 127.0.0.1
port = 1812
secret = testing123
response_window = 20
zombie_period = 40
revive_interval = 120
status_check = status-server
check_interval = 30
check_timeout = 4
num_answers_to_alive = 3
max_outstanding = 65536
coa {
irt = 2
mrt = 16
mrc = 5
mrd = 30
}
limit {
max_connections = 16
max_requests = 0
lifetime = 0
idle_timeout = 0
}
}
home_server_pool my_auth_failover {
type = fail-over
home_server = localhost
}
realm example.com {
auth_pool = my_auth_failover
}
realm LOCAL {
}freeradius/3.0/mods-available
# file: mods-available/eap
eap {
	default_eap_type = md5
	timer_expire = 60
	ignore_unknown_eap_types = no
	cisco_accounting_username_bug = no
	max_sessions = ${max_requests}
	md5 {
	}
	gtc {
		auth_type = PAP
	}
	tls-config tls-common {
		private_key_password = whatever
		private_key_file = /etc/ssl/private/ssl-cert-snakeoil.key
		certificate_file = /etc/ssl/certs/ssl-cert-snakeoil.pem
		ca_file = /etc/ssl/certs/ca-certificates.crt
		ca_path = ${cadir}
		cipher_list = "DEFAULT"
		cipher_server_preference = no
		tls_min_version = "1.2"
		tls_max_version = "1.2"
		ecdh_curve = ""
		cache {
			enable = no
			lifetime = 24 # hours
			store {
				Tunnel-Private-Group-Id
			}
		}
		verify {
		}
		ocsp {
			enable = no
			override_cert_url = yes
			url = "http://127.0.0.1/ocsp/"
		}
	}
	tls {
		tls = tls-common
	}
	ttls {
		tls = tls-common
		default_eap_type = md5
		copy_request_to_tunnel = no
		use_tunneled_reply = no
		virtual_server = "inner-tunnel"
	}
	peap {
		tls = tls-common
		default_eap_type = mschapv2
		copy_request_to_tunnel = no
		use_tunneled_reply = no
		virtual_server = "inner-tunnel"
	}
	mschapv2 {
	}
}
freeradius/3.0/sites-available
# file: sites-available/default
server default {
listen {
	type = auth
	ipaddr = *
	port = 0
	limit {
	     max_connections = 16
	     lifetime = 0
	     idle_timeout = 30
	}
}
listen {
	ipaddr = *
	port = 0
	type = acct
	limit {
	}
}
listen {
	type = auth
	ipv6addr = ::	# any.  ::1 == localhost
	port = 0
	limit {
	     max_connections = 16
	     lifetime = 0
	     idle_timeout = 30
	}
}
listen {
	ipv6addr = ::
	port = 0
	type = acct
	limit {
	}
}
authorize {
	filter_username
	preprocess
	chap
	mschap
	digest
	suffix
	eap {
		ok = return
	}
	files
	-sql
	-ldap
	expiration
	logintime
	pap
	Autz-Type New-TLS-Connection {
		 ok
	}
}
authenticate {
	Auth-Type PAP {
		pap
	}
	Auth-Type CHAP {
		chap
	}
	Auth-Type MS-CHAP {
		mschap
	}
	mschap
	digest
	eap
}
preacct {
	preprocess
	acct_unique
	suffix
	files
}
accounting {
	detail
	unix
	-sql
	exec
	attr_filter.accounting_response
}
session {
}
post-auth {
	if (session-state:User-Name && reply:User-Name && request:User-Name && (reply:User-Name == request:User-Name)) {
		update reply {
			&User-Name !* ANY
		}
	}
	update {
		&reply: += &session-state:
	}
	-sql
	exec
	remove_reply_message_if_eap
	Post-Auth-Type REJECT {
		-sql
		attr_filter.access_reject
		eap
		remove_reply_message_if_eap
	}
	Post-Auth-Type Challenge {
	}
	Post-Auth-Type Client-Lost {
	}
	if (EAP-Key-Name && &reply:EAP-Session-Id) {
		update reply {
			&EAP-Key-Name := &reply:EAP-Session-Id
		}
	}
}
pre-proxy {
}
post-proxy {
	eap
}
}
# file: sites-available/inner-tunnel
server inner-tunnel {
listen {
ipaddr = 127.0.0.1
port = 18120
type = auth
}
authorize {
filter_username
chap
mschap
suffix
update control {
&Proxy-To-Realm := LOCAL
}
eap {
ok = return
}
files
-sql
-ldap
expiration
logintime
pap
}
authenticate {
Auth-Type PAP {
pap
}
Auth-Type CHAP {
chap
}
Auth-Type MS-CHAP {
mschap
}
mschap
eap
}
session {
radutmp
}
post-auth {
-sql
if (0) {
update reply {
User-Name !* ANY
Message-Authenticator !* ANY
EAP-Message !* ANY
Proxy-State !* ANY
MS-MPPE-Encryption-Types !* ANY
MS-MPPE-Encryption-Policy !* ANY
MS-MPPE-Send-Key !* ANY
MS-MPPE-Recv-Key !* ANY
}
update {
&outer.session-state: += &reply:
}
}
Post-Auth-Type REJECT {
-sql
attr_filter.access_reject
update outer.session-state {
&Module-Failure-Message := &request:Module-Failure-Message
}
}
}
pre-proxy {
}
post-proxy {
eap
}
} # inner-tunnel server block# file: sites-available/tls
listen {
ipaddr = *
port = 2083
type = auth+acct
proto = tcp
virtual_server = default
clients = radsec
limit {
max_connections = 16
lifetime = 0
idle_timeout = 30
}
tls {
private_key_password = whatever
private_key_file = /etc/ssl/private/ssl-cert-snakeoil.key
certificate_file = /etc/ssl/certs/ssl-cert-snakeoil.pem
ca_file = /etc/ssl/certs/ca-certificates.crt
fragment_size = 8192
ca_path = ${cadir}
ca_path_reload_interval = 3600
cipher_list = "DEFAULT"
cipher_server_preference = no
tls_min_version = "1.2"
tls_max_version = "1.3"
ecdh_curve = ""
cache {
enable = no
lifetime = 24 # hours
}
require_client_cert = yes
verify {
}
}
}
clients radsec {
client 127.0.0.1 {
ipaddr = 127.0.0.1
proto = tls
secret = radsec
}
}
home_server tls {
ipaddr = 127.0.0.1
port = 2083
type = auth
secret = radsec
proto = tcp
status_check = none
tls {
private_key_password = whatever
private_key_file = /etc/ssl/private/ssl-cert-snakeoil.key
certificate_file = /etc/ssl/certs/ssl-cert-snakeoil.pem
ca_file = /etc/ssl/certs/ca-certificates.crt
fragment_size = 8192
ca_path = ${cadir}
cipher_list = "DEFAULT"
connect_timeout = 30
}
}
home_server_pool tls {
type = fail-over
home_server = tls
}
realm tls {
auth_pool = tls
}-end
ImageMagick
Use ImageMagick to create, edit, compose, and convert digital images. Resize an image, crop it, change its shades and colors, add captions, and more.
Resizing files in a directory
nice -n 19 mogrify -path . -filter Triangle -define filter:support=2 -unsharp 0.25x0.25+8+0.065 -dither None -posterize 136 -quality 82 -define jpeg:fancy-upsampling=off -define png:compression-filter=5 -define png:compression-level=9 -define png:compression-strategy=1 -define png:exclude-chunk=all -interlace none -colorspace sRGB -strip *.jpg[Source]
#end
Installation and Setup
These instructions are based around Ubuntu 24.04 (Ubuntu Sway Remix).
My workstation base
# get rid of neovim pre-0.10.1 and thunderbird just in case they're already installed
sudo apt purge neovim thunderbird
sudo apt install build-essential git pipx python3-pip vim-nox \
fish xonsh \
bat fzf ripgrep \
filezilla nautilus thunar \
remmina tshark wavemon wireshark \
network-manager-gnome network-manager-config-connectivity-ubuntu \
network-manager-l2tp-gnome \
network-manager-openvpn-gnome \
network-manager-ssh-gnome \
network-manager-sstp-gnome \
network-manager-strongswan \
wireguard \
wine wine32 wine64Neovim appimage 0.10.1
pushd /usr/local/bin
sudo wget https://github.com/neovim/neovim/releases/download/v0.10.1/nvim.appimage
sudo chmod 775 nvim.appimage
sudo ln -s nvim.appimage nvim
ls -l nvim*
popd
sudo cat <<EOF > ~/sudo_editor.sh
export SUDO_EDITOR=nvim
EOF
sudo mv ~/sudo_editor.sh /etc/profile.d/sudo_editor.sh
source /etc/profile.d/sudo_editor.shVSCode
Download VSCode from here.
sudo dpkg -i ~/Downloads/code*.debGoogle Chrome
Download Google Chrome from here.
sudo dpkg -i ~/Downloads/google-chrome-stable*.debMicrosoft Edge
Download Microsoft Edge from here.
sudo dpkg -i ~/Downloads/microsoft-edge-stable*.debNodeJS using nvm
# installs nvm (Node Version Manager)
curl -o- https://raw.githubusercontent.com/nvm-sh/nvm/v0.40.0/install.sh | bash

source ~/.bashrc

# install current stable release
nvm install node
node -v
npm -v
nvchad
Quickstart install. Make sure git, node, nvm and ripgrep are installed.
git clone https://github.com/NvChad/starter ~/.config/nvim && nvim
# :MasonInstallAll
# rm -rf ~/.config/nvim/.git/
Network applications
sudo apt install remmina tshark wavemon wiresharkVPN related packages
sudo apt install network-manager-config-connectivity-ubuntu network-manager-gnome network-manager-openvpn-gnome network-manager-l2tp-gnome network-manager-ssh-gnome network-manager-sstp-gnome network-manager-strongswan wireguardWine related packages
sudo apt install wine wine32 wine64Fancy console
iptables / ipsets
ipsets-dynamic script with systemd
This page shows how to use a BASH script executed on an interval by a SystemD Timer for the purpose of checking entries in specified ipset lists that have a comment of the format "resolve:fqdn - note". The SystemD service runs after the netfilter-persistent.service starts and then periodically based on the timer intervals.
Assumptions
ipset list -output json is a new feature. Only works on Ubuntu 24.04 and not previous versions. A workaround will be to install yq and use it to convert xml to json. Quote cleanup in the comment field will be needed.
apt install ipset-persistent iptables-persistent netfilter-persistent# file:/etc/iptables/ipsets
create dynamicallowlist hash:net family inet hashsize 1024 maxelem 65536 comment
add dynamicallowlist 1.2.3.4 comment "resolve:some-relevant-fqdn.bogus.com - Office - Denver, CO - ATT Fiber"# file:/etc/iptables/rules.v4
# super simple example
*filter
:INPUT ACCEPT [0:0]
:FORWARD ACCEPT [0:0]
:OUTPUT ACCEPT [0:0]
:WAN-IN ACCEPT [0:0]
:allowed-management - [0:0]
# allowed-management chain
-A allowed-management -s 6.7.8.9 -j ACCEPT -m comment --comment "Static endpoint just in case ipsets don't load properly"
-A allowed-management -j RETURN
-A INPUT -i lo -j ACCEPT -m comment --comment "Accept all localhost traffic"
-A INPUT -i eth0 -j WAN-IN -m comment --comment "Push inbound WAN traffic to WAN-IN chain"
-A WAN-IN -m set --match-set dynamicallowlist src -j ACCEPT -m comment --comment "Allow all traffic from managed dynamicallowlist"
-A WAN-IN -j allowed-management -m comment --comment "Legacy allowed-management chain... just in case ipsets load fails"
-A WAN-IN -p tcp -m tcp --dport 22 -j DROP -m comment --comment "Drop all other inbound SSH requests"
# list other services you want to explicitely protect
-A WAN-IN -m state --state ESTABLISHED -j ACCEPT
-A WAN-IN -m state --state RELATED -j ACCEPT
-A WAN-IN -m state --state NEW -j DROP -m comment --comment "Drop all other NEW connections"
-A WAN-IN -j DROP -m comment --comment "Drop everything else that might find its way here"Components
mkdir -p /opt/ipsets-dynamic/
touch /opt/ipsets-dynamic/ipsets-dynamic /opt/ipsets-dynamic/ipsets-dynamic.service /opt/ipsets-dynamic/ipsets-dynamic.timer
chmod 755 /opt/ipsets-dynamic/ipsets-dynamic
apt install jq# file:/etc/systemd/system/ipsets-dynamic.service
[Unit]
Description=Update ipset entries flagged by resolve comments
After=netfilter-persistent.service
Wants=netfilter-persistent.service
[Service]
Type=oneshot
ExecStart=/opt/ipsets-dynamic/ipsets-dynamic
Environment="PATH=/usr/local/sbin:/usr/local/bin:/usr/sbin:/usr/bin:/sbin:/bin"# file:/etc/systemd/system/ipsets-dynamic.timer
[Unit]
Description=Run ipsets-dynamic every 5 minutes
[Timer]
OnBootSec=1min
OnUnitActiveSec=5min
[Install]
WantedBy=timers.target#!/usr/bin/env bash
# Created: 20260205
SYSLOG_TAG="ipsets-dynamic"
IPSETS=("dynamicallowlist")
#DEBUG=1
debug() {
[[ -n "$DEBUG" ]] && echo "$@"
}
for IPSET_NAME in "${IPSETS[@]}"; do
debug "==============================="
debug "Processing ipset: $IPSET_NAME"
ipset list $IPSET_NAME -output json | grep -v initval | jq -c '
.[0].members[]
| select(.comment | contains("resolve:"))
| {
elem,
comment,
fqdn: (.comment | capture("resolve:(?<fqdn>[^ ]+)").fqdn)
}
' |
while read -r entry; do
listed_ip=$(echo "$entry" | jq -r '.elem')
comment=$(echo "$entry" | jq -r '.comment')
fqdn=$(echo "$entry" | jq -r '.fqdn')
debug "--------------------------------"
debug "IPSET : $IPSET_NAME"
debug "FQDN : $fqdn"
debug "Comment : $comment"
debug "Listed IP : $listed_ip"
DIG_RECORD_LINE=$(dig +noall +answer "$fqdn" | grep "IN\s*A")
if [ -n "$DIG_RECORD_LINE" ]; then
TTL=$(echo "$DIG_RECORD_LINE" | awk '{print $2}')
ADDRESS=$(echo "$DIG_RECORD_LINE" | awk '{print $5}')
debug "Resolved IP : $ADDRESS ($TTL seconds TTL)"
if [[ "$listed_ip" != "$ADDRESS" ]]; then
debug ""
echo "$SYSLOG_TAG - ipset update needed - $IPSET_NAME / $listed_ip -> $ADDRESS / $comment"
logger -i "$SYSLOG_TAG - ipset update needed - $IPSET_NAME / $listed_ip -> $ADDRESS / $comment"
ipset del $IPSET_NAME $listed_ip
if [[ $? -ne 0 ]]; then
debug " Failure deleting ipset entry $IPSET_NAME / $listed_ip for $fqdn"
logger -i -p user.error "$SYSLOG_TAG - ipset update failure deleting entry $IPSET_NAME / $listed_ip / $comment"
else
debug " Deleted $IPSET_NAME / $listed_ip"
fi
ipset add $IPSET_NAME $ADDRESS comment "$comment"
if [[ $? -ne 0 ]]; then
debug " [ERROR] ipset update failure adding entry $IPSET_NAME / $ADDRESS for $fqdn"
logger -i -p user.error "$SYSLOG_TAG - ipset update failure adding entry $IPSET_NAME / $ADDRESS / $comment"
else
debug " Added $IPSET_NAME / $ADDRESS for $fqdn"
fi
fi
else
debug "No A record found for $fqdn"
TTL="N/A"
ADDRESS="N/A"
fi
debug ""
done
debug ""
done
# make sure we signal a successful exit for systemd
exit 0
systemctl daemon-reload

systemctl enable --now ipsets-dynamic.timer

systemctl list-timers ipsets-dynamic.timer
watch systemctl list-timers ipsets-dynamic.timer

journalctl -u ipsets-dynamic.service -n 50ipsets fqdn resolving
Concept
- Use a Sqlite3 database to store the list of entries that need to be updated.
- A script run on an interval will perform lookups for each fqdn, no more frequent than the DNS record's TTL
next_lookup_dtis set after a lookup to the current time plus the lookup's ttl in secondsUPDATE entries SET last_lookup_dt = datetime('now'), next_lookup_dt = datetime('now', '+$ttl seconds') WHERE fqdn=$fqdn and ipset=$ipset;
- Query for a list of entries that need to be checked due to expired ttl of last lookup
SELECT * FROM entries WHERE next_lookup_dt <= datetime('now');
We have two options for dealing with changed IPs.
The first involves creating a new ipset, swapping it with the current in-memory set, and then destroying the old ipset. After lookups are performed, the current list of IP addresses in the database would be used to create a new ipset list which would then be swapped and the old list destroyed. This would be effective only if this lookup script is the only thing manipulating the ipset list.
The second involves locating and deleting the entry that needs to be updated. This allows for additional processes to manipulate the list. The output of ipset list would be searched for an entry where the command matches the fqdn lookup. That IP address would be removed from the list using an ipset del command and then the new IP addresses added with the appropriate comment set.
Code
# CREATE the sqlite3 database and table(s)
sqlite3 /opt/ipsets-dynamic/ipsets-dynamic.db <<EOF
CREATE TABLE entries (
    fqdn TEXT NOT NULL,
    ipset TEXT NOT NULL,
    last_ip_address TEXT,
    last_lookup_dt DATETIME DEFAULT (datetime('now')),
    next_lookup_dt DATETIME DEFAULT (datetime('now')),
    last_change_dt DATETIME DEFAULT (datetime('now')),
    added DATETIME DEFAULT (datetime('now')),
    comment TEXT,
    PRIMARY KEY (fqdn, ipset)
);
EOF
Example
Assuming the ipset list exists as below:
ipset list unifisiteallowlist -output json | grep -v initval# OUTPUT
[
{
"name" : "unifisiteallowlist",
"type" : "hash:net",
"revision" : 7,
"header" : {
"family" : "inet",
"hashsize" : 1024,
"maxelem" : 65536,
"comment" : true,
"bucketsize" : 12,
"memsize" : 1800,
"references" : 1,
"numentries" : 10
},
"members" : [
{
"elem" : "1.2.3.4",
"comment" : "resolve:some-fqdn.domain.com"
},
]
}
]result=$(ipset list unifisiteallowlist -output json | grep -v initval | jq -r '.[].members[] | select(.comment | contains("resolve:some-fqdn.domain.com")) | .elem')
echo $result# OUTPUT
1.2.3.4The value of result would be empty if there was no match found.
#!/bin/bash

ENTRIESDB='/opt/ipsets-dynamic/ipsets-dynamic.db'

# PROCESS ALL RECORDS
sqlite3 -separator '|' $ENTRIESDB "SELECT fqdn, ipset, last_ip_address FROM entries;" |
while IFS='|' read -r fqdn ipset ip; do
  RECORD_LINE=$(dig +noall +answer "$fqdn" | grep "IN\s*A")
  if [ -n "$RECORD_LINE" ]; then
    TTL=$(echo "$RECORD_LINE" | awk '{print $2}')
    ADDRESS=$(echo "$RECORD_LINE" | awk '{print $5}')

    if [[ "$ip" != "$ADDRESS" ]]; then
      echo "Entry: $fqdn / $ipset / $ip / $ADDRESS / $TTL - Update needed"
      # FIND AND DELETE EXISTING IPSET ENTRY
      echo "ipset del $ipset $ip"
      # CREATE NEW IPSET ENTRY
      echo "ipset add $ipset $ADDRESS comment \"resolve:$fqdn\""
      # UPDATE DATABASE
      echo "sqlite3 $ENTRIESDB \"UPDATE entries SET last_ip_address='$ip',next_lookup_dt=datetime('now','+$TTL seconds') WHERE fqdn='$fqdn' and ipset='$ipset';\""
    else
      echo "Entry: $fqdn / $ipset / $ip / $ADDRESS / $TTL - NO CHANGE"
    fi
  else
    echo "Entry: $fqdn / $ipset / $ip / NO A RECORD FOUND"
  fi
done
#!/bin/bash
ENTRIESDB='/opt/ipsets-dynamic/ipsets-dynamic.db'
# PROCESS ONLY TTL EXPIRED RECORDS
sqlite3 -separator '|' $ENTRIESDB "SELECT fqdn, ipset, last_ip_address FROM entries WHERE next_lookup_dt < datetime('now');" |
while IFS='|' read -r fqdn ipset ip; do
RECORD_LINE=$(dig +noall +answer "$fqdn" | grep "IN\s*A")
if [ -n "$RECORD_LINE" ]; then
TTL=$(echo "$RECORD_LINE" | awk '{print $2}')
ADDRESS=$(echo "$RECORD_LINE" | awk '{print $5}')
if [[ "$ip" != "$ADDRESS" ]]; then
echo "Entry: $fqdn / $ipset / $ip / $ADDRESS / $TTL - Update needed"
# FIND AND DELETE EXISTING IPSET ENTRY
echo "ipset del $ipset $ip"
# CREATE NEW IPSET ENTRY
echo "ipset add $ipset $ADDRESS comment \"resolve:$fqdn\""
# UPDATE DATABASE
echo "sqlite3 $ENTRIESDB \"UPDATE entries SET last_ip_address='$ip',next_lookup_dt=datetime('now','+$TTL seconds') WHERE fqdn='$fqdn' and ipset='$ipset';\""
else
echo "Entry: $fqdn / $ipset / $ip / $ADDRESS / $TTL - NO CHANGE"
fi
else
echo "Entry: $fqdn / $ipset / $ip / NO A RECORD FOUND"
fi
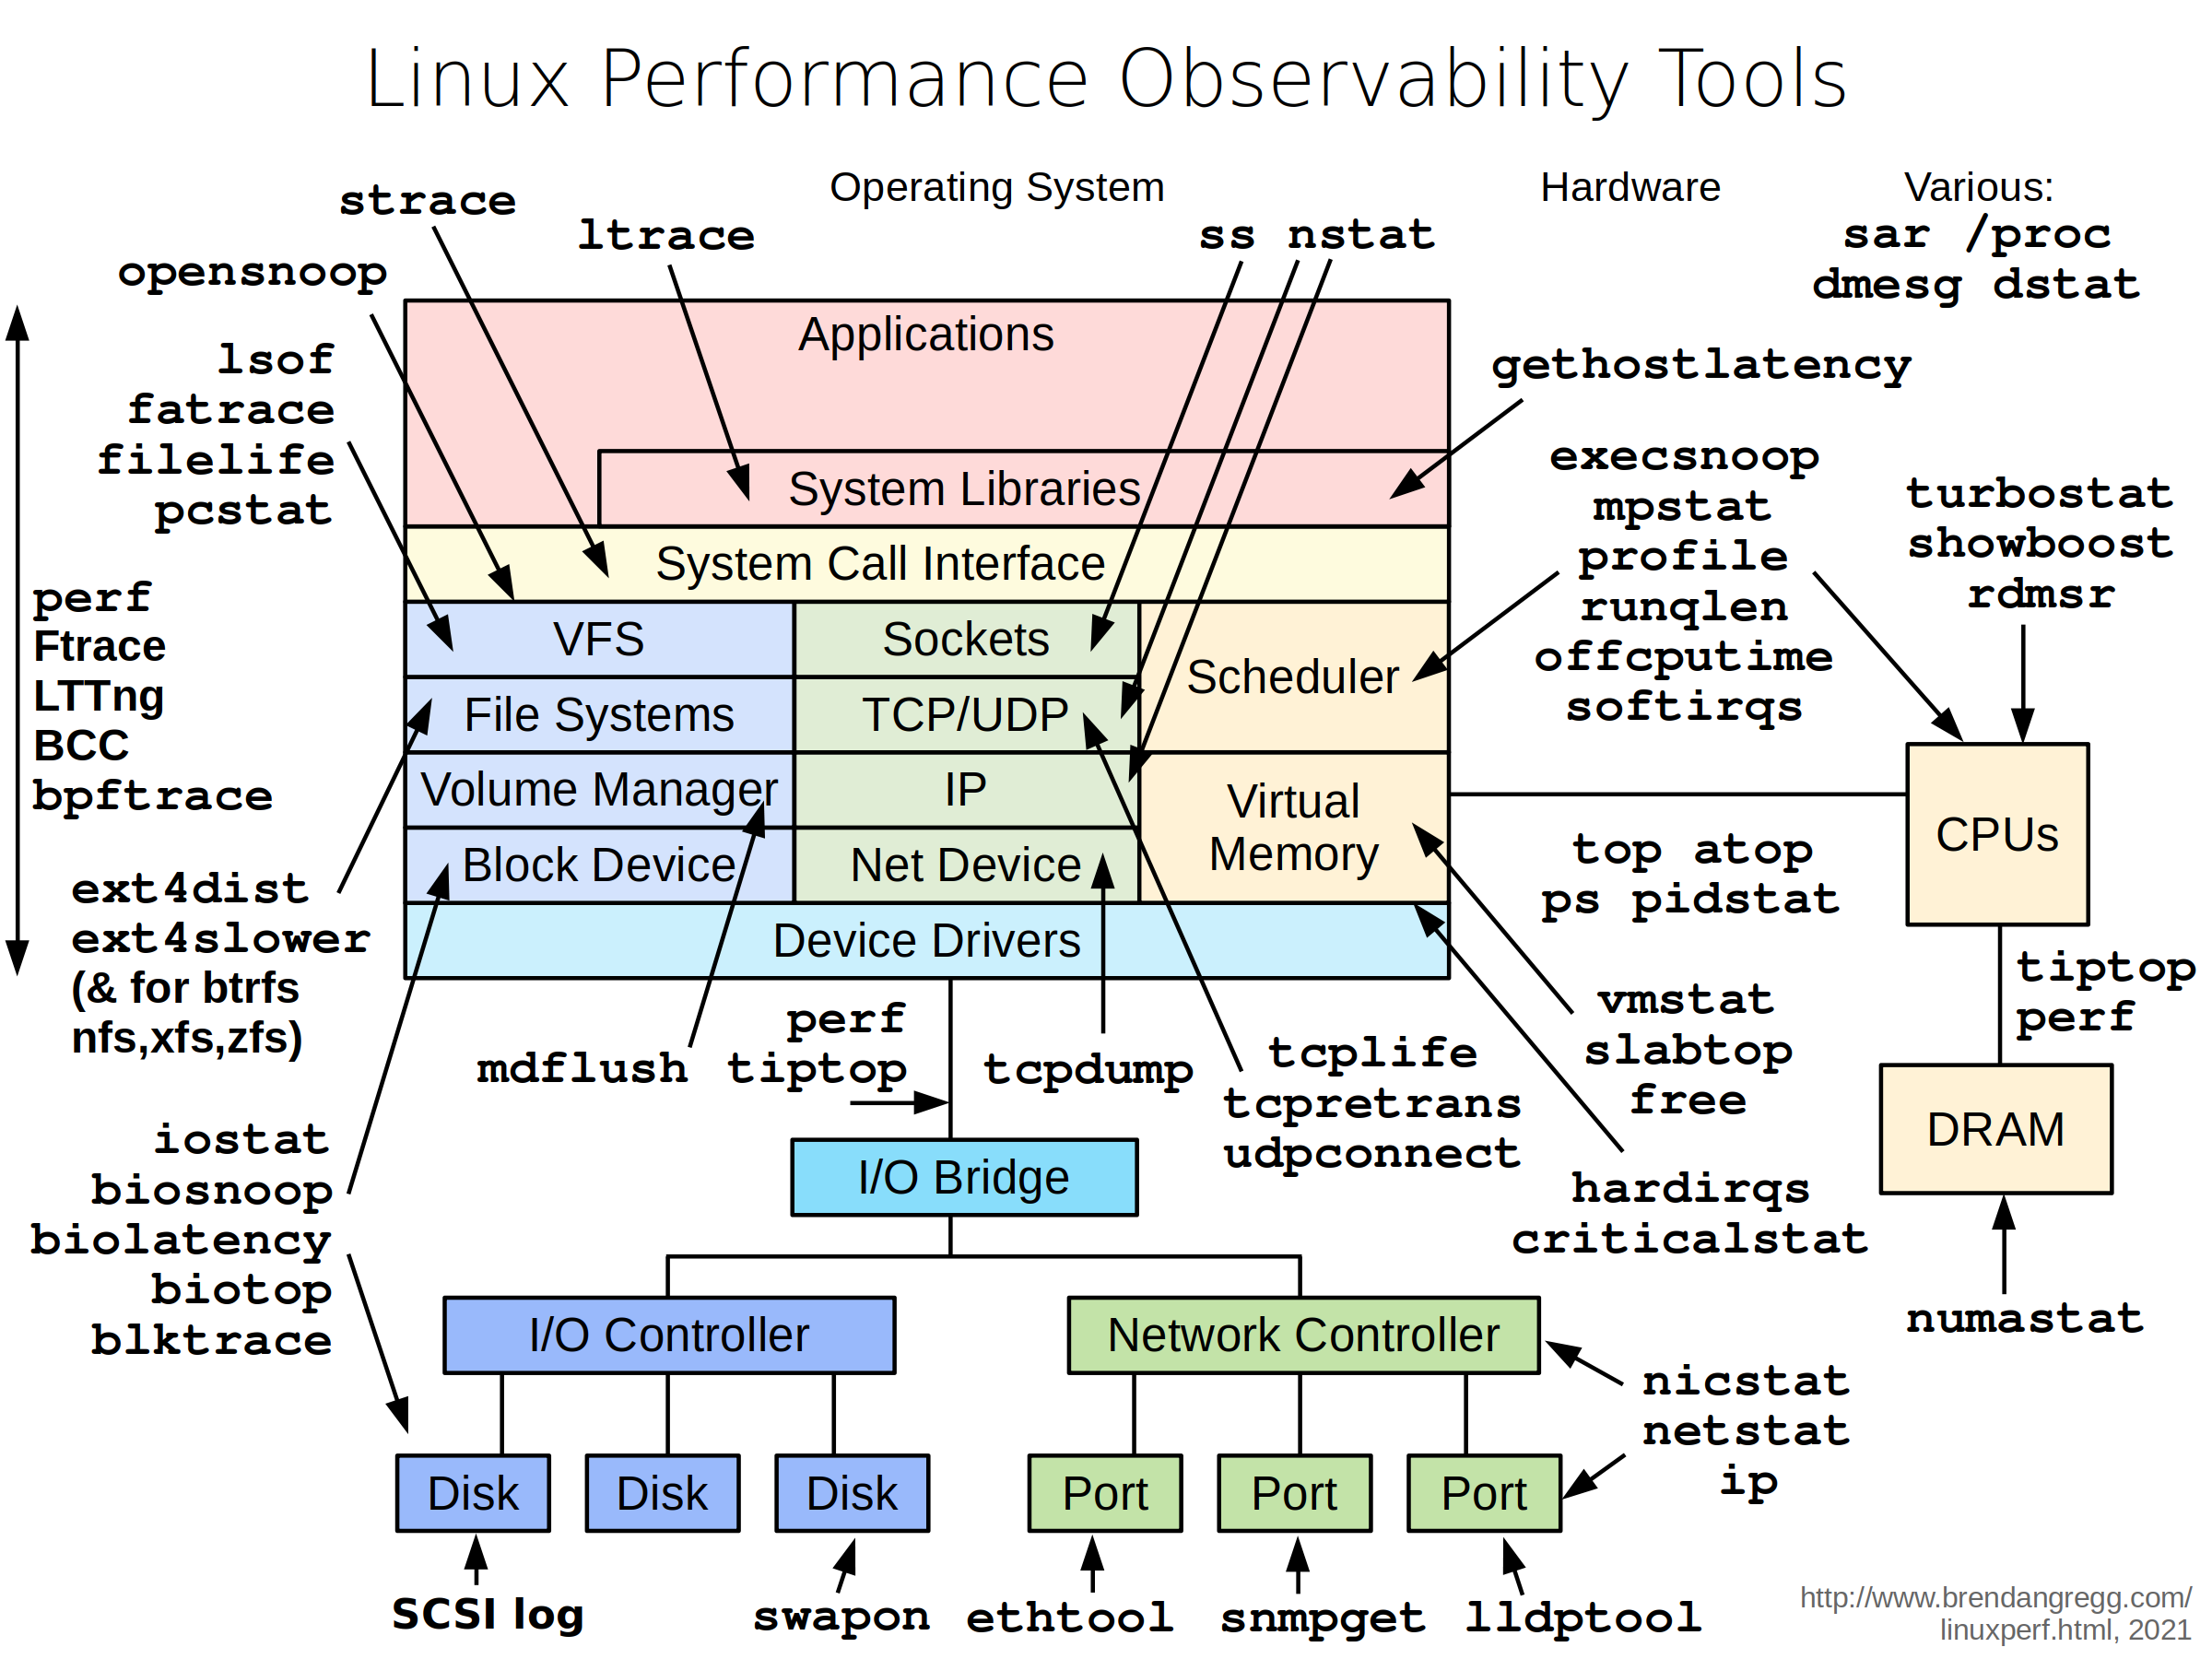
doneLinux Performance Observability
https://www.brendangregg.com/linuxperf.html

#end
Microsoft Surface Laptop 2 Touchscreen on Linux
Getting the touchscreen to work on Garuda / Arch Linux
I recently came across the Garuda Linux SwayFX variant. It looked nice so I decided to give it a try on some older Microsoft Surface Laptops. I've never used Arch Linux or a variant before. I like the look and feel of the Garuda SwayFX distribution. After loading the Surface-Linux kernel, everything worked just find on a Surface Laptop 5, but not on the Surface Laptop 2's.
After comparing the Garuda / Arch system to a working Surface Laptop 2 running Ubuntu Sway Remix 24.04, I noticed the kernel modules mei and mei_me weren't loaded on the Garuda / Arch system. When I manually used modprobe to load the two modules the touchscreen began to work immediately.
It took me a while to track it down, but I finally found that these two modules were blacklisted in the file shown below. After commenting those two lines out and rebooting, the touchscreen started working on boot.
# File: /usr/lib/modprobe.d/noime.conf
# Intel VPRO remote access technology driver.
# 202040704 - Comment these two lines out. They're needed for Surface Laptop 2 touchscreen to work
#blacklist mei
#blacklist mei_me
With those two modules no longer blacklisted the IPTS devices finally showed up in the input devices list.
 ╭─user@local in ~ took 2ms
 ╰─λ lsmod | grep mei
mei_hdcp               28672  0
mei_pxp                20480  0
mei_me                 57344  3
mei                   200704  7 mei_hdcp,mei_pxp,mei_me,ipts

 ╭─user@local in ~ took 9ms
 ╰─λ grep IPTS /proc/bus/input/devices
N: Name="IPTS 1B96:0979 Touchscreen"
N: Name="IPTS 1B96:0979"
N: Name="IPTS Touch"
N: Name="IPTS Stylus"
NUT - Network UPS Tools
Ubuntu 24.04 Issues
Out of the box, you receive the following errors when running nut-scanner:
$ nut-scanner -U
Cannot load USB library (libusb-1.0.so) : file not found. USB search disabled.
Cannot load SNMP library (libnetsnmp.so) : file not found. SNMP search disabled.
Cannot load XML library (libneon.so) : file not found. XML search disabled.
Cannot load AVAHI library (libavahi-client.so) : file not found. AVAHI search disabled.
Cannot load IPMI library (libfreeipmi.so) : file not found. IPMI search disabled.
Cannot load NUT library (libupsclient.so) : file not found. NUT search disabled.
nut-scanner : utility for detection of available power devices.

OPTIONS:
  -C, --complete_scan: Scan all available devices except serial ports (default).
* Options for USB devices scan not enabled: library not detected.
* Options for SNMP devices scan not enabled: library not detected.
* Options for XML/HTTP devices scan not enabled: library not detected.
  -O, --oldnut_scan: Scan NUT devices (old method).
* Options for NUT devices (avahi method) scan not enabled: library not detected.
* Options for IPMI devices scan not enabled: library not detected.
  -E, --eaton_serial <serial ports list>: Scan serial Eaton devices (XCP, SHUT and Q1).
  -T, --thread <max number of threads>: Limit the amount of scanning threads running simultaneously (default: 512).

Note: many scanning options depend on further loadable libraries.
Run-time loadable library search paths used by this build of NUT:
	NOTE: Reporting filtered (existing unique) built-in paths:
	Built-in:	/usr/lib/x86_64-linux-gnu
	Built-in:	/usr/lib64
	Built-in:	/usr/lib
	Built-in:	/usr/local/lib
	Built-in:	/usr/lib/gcc/x86_64-linux-
The only issue I could find posted was Libraries not found (Ubuntu 24.04 Server arm) #2431, yet it didn't seem to have a resolution. I haven't read every bit of the issue, but the root of cause is pretty obvious that some package is no longer providing the symlinks that are expected to exist.
The easy solution is to create symlinks for the files its looking for to the files that actually exist.
pushd /usr/lib/x86_64-linux-gnu/
sudo ln -s libusb-1.0.so.0 libusb-1.0.so
sudo ln -s libnetsnmp.so.40 libnetsnmp.so
sudo ln -s libavahi-client.so.3 libavahi-client.so
sudo ln -s libfreeipmi.so.17 libfreeipmi.so
sudo ln -s libneon-gnutls.so.27 libneon.so
popd
After creating the symlinks, everything is working like a champ.
CyberPower CP1000PFCLCDa UPS Configuration
# /etc/nut/nut.conf
MODE=standalone
#MODE=netserver
# /etc/nut/ups.conf
maxretry = 3
# use "nut-scanner -U" to scan for connected UPS's
[cyberpower1]
driver = "usbhid-ups"
port = "auto"
vendorid = "0764"
productid = "0601"
product = "CP1000PFCLCDa"
serial = "CX1KP2001248"
vendor = "CPS"
bus = "001"
pollinterval = 15# /etc/nut/upsd.conf
LISTEN 0.0.0.0 3493# /etc/nut/upsd.users
[monuser]
password = REDACTED
admin master# /etc/nut/upsmon.conf
MINSUPPLIES 1
SHUTDOWNCMD "/sbin/shutdown -h +0"
POLLFREQ 5
POLLFREQALERT 5
HOSTSYNC 15
DEADTIME 25
POWERDOWNFLAG /etc/killpower
RBWARNTIME 43200
NOCOMMWARNTIME 300
FINALDELAY 5Actual logs from a power-related shutdown
These are the logs from a DELL Latitude 5500 connected to a Smart UPS 750 via USB. The UPS was on battery for ~7 minutes before hitting battery low state and initiating an automatic power-fail shutdown.
2024-11-06T00:09:54.168676-06:00 server1 nut-monitor[1203]: UPS smartups750@localhost on battery
2024-11-06T00:09:54.179395-06:00 server1 nut-monitor[366128]: PIPEFN must be set before any ATs in the config file!
2024-11-06T00:09:54.179755-06:00 server1 nut-monitor[366128]: PIPEFN must be set before any ATs in the config file!
2024-11-06T00:09:54.179958-06:00 server1 upssched[366128]: PIPEFN must be set before any ATs in the config file!
2024-11-06T00:09:54.181207-06:00 server1 nut-monitor[366124]: Network UPS Tools upsmon 2.8.1
2024-11-06T00:16:54.235149-06:00 server1 nut-monitor[1203]: UPS smartups750@localhost battery is low
2024-11-06T00:16:54.236230-06:00 server1 nut-monitor[1203]: FSD set on UPS smartups750@localhost failed: ERR ACCESS-DENIED
2024-11-06T00:16:54.236442-06:00 server1 nut-monitor[1203]: Executing automatic power-fail shutdown
2024-11-06T00:16:54.242982-06:00 server1 nut-monitor[1203]: Auto logout and shutdown proceeding
-end
SSH load key error in libcrypto
Occasionally on Ubuntu 22.04 I've experienced the error message shown below when trying to connect to a server using an ssh key:
$ ssh user@server.com -i ~/.ssh/id_ed25519
Load key "id_ed25519": error in libcrypto
I finally realized the problem was the presence of DOS style CRLF end of line designators. Using dos2unix to convert the end of line designators resolved the issue.
$ dos2unix ~/.ssh/id_ed25519#end
Supermicro fan control
Quick and dirty
Login to the IPMI interface, go Configuration -> Fan Speed -> Power Usage Effectiveness mode
More stuff
apt install ipmiutil
Show current fan speeds
ipmiutil sensor -g fan
-end
Sway
Ubuntu Sway Remix
Recording changes I make to the default configuration in Ubuntu Sway Remix
bind keys
# /etc/sway/modes/default.conf
$bindsym Ctrl+Alt+delete exec nwg-bar -x
brightness control
# from /etc/sway/variables
# brightness control - very fine grained control
set $brightness_step bash -c 'echo $(( $(light -Mr) / 100 * 1 < 100 ? 50 : $(( $(light -Mr) / 100 * 2 )) ))'
set $brightness_up light -r -A $($brightness_step) && $onscreen_bar $(light -G | cut -d'.' -f1)
set $brightness_down light -r -U $($brightness_step) && $onscreen_bar $(light -G | cut -d'.' -f1)
idle configuration
Set $idle_timeout to 300, $locking_timeout to 3600, and $screen_timeout to 600.
Update the timeout $idle_timeout action to set the idle light level to 1 instead of 10.
### Idle configuration
# This will lock your screen after 300 seconds of inactivity, then turn off
# your displays after another 300 seconds, and turn your screens back on when
# resumed. It will also lock your screen before your computer goes to sleep.
#
set $lock ~/.config/swaylock/lock.sh
set $idle_timeout 300
set $locking_timeout 3600
set $screen_timeout 600
set $idle swayidle -w \
    timeout $idle_timeout 'light -G > /tmp/brightness && light -S 1' resume 'light -S $([ -f /tmp/brightness ] && cat /tmp/brightness || echo 100%)' \
    timeout $locking_timeout $lock \
    timeout $screen_timeout 'swaymsg "output * dpms off"' \
    resume 'swaymsg "output * dpms on"' \
    before-sleep 'playerctl pause' \
    before-sleep $lock & \
    lock $lock &
power alert
Add the following to ~/.config/mako/config and then reload sway:
[app-name="poweralertd"]
invisible=1
background
#!/usr/bin/env bash
# file:~/.azotebg
pkill swaybg
#swaybg -o '*' -i "/usr/share/wallpapers/warty-final-ubuntusway.png" -m fill &
swaybg -o '*' -c \#003366
window positions
I put my placement and startup apps in ~/.config/sway/config.d/my-apps.conf
# file: ~/.config/sway/config.d/my-apps.conf

# man 5 sway
# Syntax: assign [match_criteria] workspace <workspace_name/number>

#######################
# application placement

# I want a foot client on workspace 2 when I login to sway
for_window [app_id="foot" title="foot startup"] move container to workspace 2

# I want the 1Password main window on workspace 10, but all other windows should pop on my current workspace
for_window [app_id="1password" title=".* — .* — 1Password"] move container to workspace 10

# Minecraft related
# ATLauncher and Minecraft game on workspace 3, everything else on workspace 9
for_window [title="win0" class="com-atlauncher-App"] move container to workspace 9
for_window [title="ATLauncher"] move container to workspace 3
for_window [title="ATLauncher Console"] move container to workspace 9
for_window [title="^Minecraft.*" class="^Minecraft.*"] move container to workspace 3


#####################
# statup applications
exec foot --title="foot startup"
exec google-chrome-stable
# 1Password crashes if you start it too early on login, not sure what its waiting on
exec "sleep 2 && 1password"
To see the hierarchy and properties of all current windows, use this command:
swaymsg -t get_treeTo edit your custom config file (with vim b/c why would you use anything else!?):
vim ~/.config/sway/config.d/my-apps.conf#end
Ubuntu console-setup for setting console font
By default, on a Surface laptop running Ubuntu Sway Remix, the console font is waaay too small for my aging eyes, so I set off to learn how to change it.
sudo dpkg-reconfigure console-setup- UTF-8
- Guess optimal character set
- Do not change the boot/kernel font
Results in the following /etc/default/console-setup contents:
ACTIVE_CONSOLES="/dev/tty[1-6]"

CHARMAP="UTF-8"

CODESET="guess"
FONTFACE=""
FONTSIZE=""

VIDEOMODE=
#end
Ubuntu desktop launchers
Mikrotik The Dude
The Dude runs well under Wine. Running the installer will generate all needed desktop launchers.
[Desktop Entry]
Name=The Dude 7.15.2
Exec=env WINEPREFIX="/home/msharp/.wine-dude-7.15.2" wine C:\\\\Dude-7.15.2\\\\dude.exe
#Exec=wine C:\\\\Dude\\\\dude.exe
Type=Application
StartupNotify=true
Icon=/usr/share/icons/Mikrotik/thedude.png
Mikrotik Winbox
[Desktop Entry]
Name=Winbox
Path=~/bin
Exec=wine-stable winbox.exe
Type=Application
StartupNotify=true
Keywords=winbox;
or
[Desktop Entry]
Name=Winbox
Comment=Mikrotik Winbox
Exec=wine "C:\\\\Scripts\\\\winbox.exe"

# Name=Winbox64
# Comment=Mikrotik Winbox64
# Exec=wine "C:\\\\Scripts\\\\winbox64.exe"

Icon=wine
Terminal=false
Type=Application
Categories=Wine;
StartupNotify=true# Make sure winbox.exe has been saved to /usr/local/bin/winbox.exe
[Desktop Entry]
Name=Winbox
#Path=/usr/local/bin
Exec=wine-stable winbox.exe
Type=Application
StartupNotify=true
Keywords=winbox;#end
Ubuntu unattended upgrades
# enable unattended upgrades
dpkg-reconfigure --priority=low unattended-upgrades
# edit unattended-upgrades config file
vim /etc/apt/apt.conf.d/50unattended-upgradesUnattended-Upgrade::Automatic-Reboot "true";
Unattended-Upgrade::Automatic-Reboot-WithUsers "true";
Unattended-Upgrade::Automatic-Reboot-Time "02:00";Unattended-Upgrade::Mail "";
Unattended-Upgrade::MailReport "always";# test unattended-upgrade
unattended-upgrade -v -d --dry-runMonitoring activity
# activity logs
cat /var/log/unattended-upgrades/unattended-upgrades.log
less /var/log/unattended-upgrades/unattended-upgrades.log
tail -f /var/log/unattended-upgrades/unattended-upgrades.log

# check dpkg logs
cat /var/log/unattended-upgrades/unattended-upgrades-dpkg.log
less /var/log/unattended-upgrades/unattended-upgrades-dpkg.log
tail -f /var/log/unattended-upgrades/unattended-upgrades-dpkg.log

# check system timer status
systemctl status apt-daily-upgrade.timer
Useful system commands
Memory
# Show maximum capacity and number of RAM slots
sudo dmidecode -t 16
# Show information on RAM in slots
sudo dmidecode -t 17

# Shows all memory related information in the system. Slow as it polls all hardware first.
sudo lshw -class memory
VBAN for Linux
https://github.com/quiniouben/vban
I've used Voicemeeter Banana and Potato for a long time to do advanced audio management on my various computers, including streaming audio from various computers in the house to my laptop and vice versa.
VBAN for Linux allows me to incorporate some older laptops (that have trouble running Windows but no problem running Ubuntu Desktop) into my various setups. Primarily I use a second laptop to stream Youtube or Udemy videos while I'm using my primary Windows laptop. Bluetooth headset is connected to the primary laptop and all other audio sources are sinked to it. 👍
Configuring Ubuntu 20.04 to sink audio and use vban_emitter to stream to a VBAN receiver
Preparing Pulseaudio
#!/bin/bash

pactl load-module module-null-sink sink_name=vbanmix

# use "pactl info" or "pactl list" to find the proper alsa_output interface
pactl load-module module-combine-sink channels=2 slaves=vbanmix,alsa_output.pci-0000_00_1b.0.analog-stereo

pactl set-default-source vbanmix.monitor
Running vban_emitter
#!/bin/bash

IPADDR=10.10.10.10
UDPPORT=6980
STREAMNAME=Linux_Laptop
SAMPLERATE=48000

AUDIOBACKEND=pulseaudio

vban_emitter --ipaddress=$IPADDR --port=$UDPPORT --streamname=$STREAMNAME --backend=$AUDIOBACKEND --rate=$SAMPLERATE
Running on a headless system
After banging my head against the wall for weeks trying to figure out how to get vban_emitter working on a Raspberry Pi and an f80a, here's what I found.
By default, Pulseaudio only works with a user logged in directly to the system. After trying to get Pulseaudio setup to run in system mode, I realized it's much easier to just leverage ALSA directly.
The default ALSA configuration is set to use CARD 0. When using USB devices, these are inserted as CARD 1. In order to use this, you need to either update or create the /etc/asound.conf file with the information below:
# /etc/asound.conf
defaults.pcm.card 1
defaults.ctl.card 1
Here's the vban_emitter command to use:
vban_emitter -i IP_ADDRESS -p 6789 -s STREAM_NAME -b alsa
-end
Wayland
While trying out Ubuntu 23.04 via Ubuntu Sway Remix 23.04, I've noticed a lot of issues with blurry programs. After doing some research, I've found that this is due to applications using the X11 protocols to access the display via Xwayland instead of using the native Wayland protocols. I didn't have this issue running Ubuntu Sway Remix 22.04, so I'm very curious what has changed.
I'm starting to document what I'm learning hear and adding links.
Resources
- Running programs natively under Wayland - from the swaywm project
- Environment variables for Wayland hackers - Canonical forum post
Individual applications
atlauncher on Arch / Garuda Linux
In order for atlauncher to run properly in Sway or SwayFX on Wayland, you need to tweak the Exec line by adding env _JAVA_AWT_WM_NONREPARENTING=1 as shown below. This is the launcher file located at /usr/share/applications/atlauncher.desktop
Install atlauncher, java jre21, and Visual Studio Code (editor)
pacman -S atlauncher jre21-openjdk visual-studio-code-binFrom a console, use VSCode to edit the atlauncher.desktop file to match the contents shown below.
# use Visual Studio Code to edit the atlauncher.desktop file
EDITOR="code -w" sudoedit /usr/share/applications/atlauncher.desktop
Reference content of the atlauncher.desktop file:
[Desktop Entry]
Name=ATLauncher
GenericName=ATLauncher
Comment=A launcher for Minecraft which integrates multiple different modpacks to allow you to down
load and install modpacks easily and quickly.
Exec=env _JAVA_AWT_WM_NONREPARENTING=1 atlauncher
Icon=atlauncher
Terminal=false
Type=Application
Categories=Game;
Keywords=game;Minecraft;
Flatpak
VS Code
Adding "--enable-features=UseOzonePlatform --ozone-platform=wayland" to the code launcher fixes the issue. I updated all of the /usr/share/applications/code*.desktop files appropriately.
Wayvnc
Make sure you change the username and password in the configuration file you create.
RSA-AES encryption configuration
mkdir ~/.config/wayvnc
ssh-keygen -m pem -f ~/.config/wayvnc/rsa_key.pem -t rsa -N ""
cat <<EOF > ~/.config/wayvnc/config
use_relative_paths=true
address=0.0.0.0
enable_auth=true
username=luser
password=p455w0rd
rsa_private_key_file=rsa_key.pemTLS encryption configuration
# creating a self-signed key pair
mkdir ~/.config/wayvnc
openssl req -x509 -newkey ec -pkeyopt ec_paramgen_curve:secp384r1 -sha384 \
        -days 3650 -nodes \
        -keyout ~/.config/wayvnc/tls_key.pem \
        -out ~/.config/wayvnc/tls_cert.pem \
        -subj /CN=`hostname` \
        -addext subjectAltName=DNS:localhost,DNS:localhost,IP:127.0.0.1
use_relative_paths=true
address=0.0.0.0
enable_auth=true
username=luser
password=p455w0rd
private_key_file=tls_key.pem
certificate_file=tls_cert.pemRealVNC Viewer is the only Windows viewer that has support for RSA-AES and TLS encryption. To make the connection stable make the following configuration changes in RealVNC:
- General -> Security -> Encryption: Always on
- Options -> General -> Picture quality: Medium
-end