Microsoft
- Event Logs
- Excel
- Installing Certificates on Windows
- Junctions
- Microsoft Remote Desktop Certificates
- Network Policy Server / NPS
- On-Prem to Azure DNS Migration
- OpenSSH on Windows
- PowerShell
- Active Directory
- Basics
- Errors and Solutions
- Firewall management
- Group Policy and PowerShell
- Querying Event Logs
- Snippets
- Useful PowerShell Commands
- Windows Network Management from the command line
- Resource Usage
- 64-bit or 32-bit machine / ps host / process
- Installed software via PowerShell
- TCP/IP Reset
- Teams
- Transitioning from old to new
- Useful MSSQL Queries
- Sysinternals
- Power Automate
- Microsoft Remote Desktop
- PowerShell Modules
- Microsoft 365 Licensing
- Microsoft wireless network report
- PKI
Event Logs
DCSync Related
<QueryList>
  <Query Id="0" Path="Security">
    <Select Path="Security">*[System[(EventID=4662)]]</Select>
  </Query>
</QueryList>
GPO Drive Map Troubleshooting
<QueryList>
  <Query Id="0" Path="Microsoft-Windows-GroupPolicy/Operational">
    <Select Path="Microsoft-Windows-GroupPolicy/Operational">*[System[(EventID='4001')]]</Select>
    <Select Path="Microsoft-Windows-GroupPolicy/Operational">*[System[(EventID='5017')]]</Select>
    <Select Path="Microsoft-Windows-GroupPolicy/Operational">*[System[(EventID='5312')]]</Select>
    <Select Path="Microsoft-Windows-GroupPolicy/Operational">*[System[(EventID='4016')]]</Select>
  </Query>
</QueryList>
Recently installed software
This will only show software related installation events that are still stored in the system event log, so be mindful of the date of the last event log entry to know how far back logs are available.
Get-WinEvent -ProviderName MsiInstaller | where id -eq 1033 | select TimeCreated,Message | Format-ListWindows IP address conflict
<QueryList>
  <Query Id="0" Path="System">
    <Select Path="System">*[System[(EventID='4199')]]</Select>
  </Query>
</QueryList>
Log example:
The system detected an address conflict for IP address 10.X.Y.Z with the system having network hardware address 00-1F-FE-D8-31-00. Network operations on this system may be disrupted as a result.Via PowerShell:
$query = @"
<QueryList>
  <Query Id="0" Path="System">
    <Select Path="System">*[System[(EventID='4199')]]</Select>
  </Query>
</QueryList>
"@

$ipConflictEvents = Get-WinEvent -FilterXml $query -Oldest
$ipConflictEvents | Format-Table
Windows RDP-Related Event Logs
Below is a consolidated XML query of all of the event ids related in the above document. I have yet to have this actually solve a problem for me as of 5/30/2024. I still need to dive into the details of the individual log entries with different types and data.
<QueryList>
  <Query Id="0" Path="System">
    <Select Path="Microsoft-Windows-TerminalServices-RemoteConnectionManager/Operational">*</Select>
    <Select Path="Security">*[System[(EventID=4624)]]</Select>
    <Select Path="Security">*[System[(EventID=4625)]]</Select>
    <Select Path="Security">*[System[(EventID=4634)]]</Select>
    <Select Path="Security">*[System[(EventID=4647)]]</Select>
    <Select Path="Security">*[System[(EventID=4778)]]</Select>
    <Select Path="Security">*[System[(EventID=4779)]]</Select>
    <Select Path="System">*[System[(EventID=9009)]]</Select>
  </Query>
</QueryList>
#end
Excel
Conditional highlighting with functions
This is a collection of frequently used functions for conditional highlighting in Excel.
Highlight cells that are formatted dates and the dates are older than X days. Applies to =$A:$A if all dates you want highlighted are in the A column.
=IF(LEFT(CELL("format",A1),1)="D",IF(A1<TODAY()-37,TRUE,FALSE),FALSE):end
Installing Certificates on Windows
Using PowerShell to install into the Local Computer store
This can only be done with elevated privileges.
Import-Certificate -CertStoreLocation Cert:\LocalMachine\Root -FilePath cert.crtViewing certificate store contents
Get-ChildItem Cert:\LocalMachine\My | Sort-Object -Property Subject
Get-ChildItem Cert:\LocalMachine\Root | Sort-Object -Property Subject
Get-ChildItem Cert:\LocalMachine\TrustedPublisher | Sort-Object -Property Subject
Get-ChildItem Cert:\CurrentUser\My | Sort-Object -Property Subject
Get-ChildItem Cert:\CurrentUser\Root | Sort-Object -Property Subject
Get-ChildItem Cert:\CurrentUser\TrustedPublisher | Sort-Object -Property SubjectViewing cert information from extensions
# Show all relevant local computer certificate information

Get-ChildItem Cert:\LocalMachine\My |
ForEach-Object {
    $sanExtension = $_.Extensions |
        Where-Object { $_.Oid.Value -eq '2.5.29.17' }

    if ($sanExtension) {
        [PSCustomObject]@{
            Subject        = $_.Subject
            IssuingCA      = $_.Issuer
            Thumbprint     = $_.Thumbprint
            NotBefore      = $_.NotBefore
            NotAfter       = $_.NotAfter
            DnsNames       = ($_.DnsNameList -join ', ')
        }
    }
}
Viewing certs and validate trust chain
Get-ChildItem Cert:\LocalMachine\My |
ForEach-Object {

    $chain = New-Object System.Security.Cryptography.X509Certificates.X509Chain
    $chain.ChainPolicy.RevocationMode = 'Online'
    $chain.ChainPolicy.RevocationFlag = 'EntireChain'
    $chain.ChainPolicy.VerificationFlags = 'NoFlag'
    $chain.ChainPolicy.VerificationTime = Get-Date

    $isTrusted = $chain.Build($_)

    # Extract SAN (DNS names)
    $san = $_.DnsNameList -join ', '

    [PSCustomObject]@{
        Subject        = $_.Subject
        IssuingCA      = $_.Issuer
        Thumbprint     = $_.Thumbprint
        NotAfter       = $_.NotAfter
        DnsNames       = $san
        Trusted        = $isTrusted
        ChainStatus    = if ($isTrusted) {
                            'Success'
                         } else {
                            ($chain.ChainStatus | Select-Object -ExpandProperty Status) -join ', '
                         }
        ChainElements  = ($chain.ChainElements |
                          ForEach-Object { $_.Certificate.Subject }) -join ' -> '
    }
}
end
Junctions
Finding junctions / reparse points
# return all reparse points on the C: volume
DIR C:\ /S /AL
Checking reparse points
fsutil reparsepoint query [dir/file]
#end
Microsoft Remote Desktop Certificates
Manually replacing RDP certificate
Install the new certificate in the Local Computer Personal store:
If no password is needed:
Import-PfxCertificate -CertStoreLocation Cert:\LocalMachine\My -FilePath cert.pfxOr if a password is needed:
$mypwd = Get-Credential -UserName 'Enter password below' -Message 'Enter password below'
Import-PfxCertificate -CertStoreLocation Cert:\LocalMachine\My -Password $mypwd.Password -FilePath cert.pfx
After installing the new certificate in the Local Computer Personal store, run the following commands:
Set-Location Cert:\LocalMachine\my
Get-ChildItem
Pick the Thumbprint of the certificate you wish to use then run the following command using the proper thumbprint:
#Replace Certificate for RDS
wmic /namespace:\\root\cimv2\TerminalServices PATH Win32_TSGeneralSetting Set SSLCertificateSHA1Hash="[new_cert_thumbprint]"
This effectively updates the registry key:HKEY_LOCAL_MACHINE\SYSTEM\CurrentControlSet\Control\Terminal Server\WinStations\RDP-Tcp\SSLCertificateSHA1Hash
Use the following command to verify that the proper certificate is being used:
Get-WmiObject "Win32_TSGeneralSetting" -Namespace root\cimv2\terminalservices -Filter "TerminalName='RDP-tcp'"Windows Server 2022 method
Couldn't the WMI method to work on Windows Server 2022. This did.
$serverName = "MYTS01"
$certHash = "xxxxx"
$path = (Get-WmiObject "Win32_TSGeneralSetting" -ComputerName $serverName -Namespace root\cimv2\terminalservices -Filter "TerminalName='RDP-tcp'")
Set-WmiInstance -Path $path -Arguments @{SSLCertificateSHA1Hash=$certHash}
Signing RDP files
Use the rdpsign app to
rdpsign /sha256 xxxxxxxx "Remote Desktop File.rdp"Windows Server 2022 Remote Desktop Services Deployment Management
Work in progress
$computerName = 'Somecomputer'
$remotePath = '\\10.10.10.10'
$certFilePath = '\\10.10.10.10\tmp\certs\mycert.pfx'

Enter-PSSession $computerName

# for non-domain RemotePath prefix the username with localhost: localhost\admin
$nasCredential = Get-Credential
New-SmbMapping -RemotePath $remotePath -UserName $nasCredential.UserName -Password $nasCredential.GetNetworkCredential().Password

# import the cert
Import-PfxCertificate -FilePath $certFilePath -CertStoreLocation Cert:\LocalMachine\My

cd Cert:\LocalMachine\My
dir
$certThumbprint = ''

# Check the Remote Desktop Services Deployment
Get-RDCertificate

# Update the RDS roles to use the provided certificate
Set-RDCertificate -Role RDRedirector -Thumbprint $certThumbprint
Set-RDCertificate -Role RDPublishing -Thumbprint $certThumbprint
Set-RDCertificate -Role RDWebAccess -Thumbprint $certThumbprint
Set-RDCertificate -Role RDGateway -Thumbprint $certThumbprint

# Check the Remote Desktop Services Deployment
Get-RDCertificate
#end
Network Policy Server / NPS
Enable NTLMv2 support for MSCHAPv2 RADIUS requests
Enables proxied radius requests when using things like radsecproxy, duoauthproxy, etc. Avoids the MS-CHAP-Error responses.
$registryPath = "HKLM:\System\CurrentControlSet\Services\RemoteAccess\Policy"
$propertyName = "Enable NTLMv2 Compatibility"
$propertyValue = "1"

New-ItemProperty -Path $registryPath -Name $propertyName -Value $propertyValue -PropertyType DWORD -Force

Stop-Service IAS
Sleep 2
Start-Service IAS
On-Prem to Azure DNS Migration
The Azure CLI can easily be used to do this migration. Here's the steps to use the Azure CLI:
- Create the new zone in Azure via the portal or the azure-cli create command.
- Export the newly created zone from Azure to get the new SOA and NS records.
- Open the original zone file to import into Azure.
- Delete the existing SOA and NS records.
- Copy the exported SOA and NS records and paste them into the original zone file.
- Update the SOA serial number. The recommended format is YYYYMMDD1
- Save the changes to the original zone file.
- Use the azure-cli command to import the zone file.
- Go to the Azure Portal and validate that the zone file was imported correctly. A visual inspection of records is highly recommended for thoroughness.
- Once validated, go to the registrar and update the name servers.
The above process can be accomplished through the portal by creating the zone and manually adding each record. Don't forget to update the serial number in the SOA record of the newly created zone.
Azure CLI command to import zone file
Note the zone file must be properly formatted. The first record must be the SOA resource, and the NS records have to match the Azure DNS NS records.
az network dns zone import -g [Azure-Resource-Group] -n [zone_name] -f [imported_zone_file]
Azure CLI command to export zone file from Azure
az network dns zone export -g [Azure-Resource-Group] -n [zone_name] -f [exported_zone_file]
OpenSSH on Windows
Check if OpenSSH is available
Get-WindowsCapability -Online | Where-Object Name -like 'OpenSSH*'
Install OpenSSH Client and Server
# Install the OpenSSH Client
Add-WindowsCapability -Online -Name OpenSSH.Client~~~~0.0.1.0

# Install the OpenSSH Server
Add-WindowsCapability -Online -Name OpenSSH.Server~~~~0.0.1.0
Start OpenSSH Server
# Start the sshd service
Start-Service sshd
Set OpenSSH Server to start automatically on boot
# OPTIONAL but recommended:
Set-Service -Name sshd -StartupType 'Automatic'
Make sure the firewall doesn't block the OpenSSH Server
# Confirm the Firewall rule is configured. It should be created automatically by setup. Run the following to verify
if (!(Get-NetFirewallRule -Name "OpenSSH-Server-In-TCP" -ErrorAction SilentlyContinue | Select-Object Name, Enabled)) {
    Write-Output "Firewall Rule 'OpenSSH-Server-In-TCP' does not exist, creating it..."
    New-NetFirewallRule -Name 'OpenSSH-Server-In-TCP' -DisplayName 'OpenSSH Server (sshd)' -Enabled True -Direction Inbound -Protocol TCP -Action Allow -LocalPort 22
} else {
    Write-Output "Firewall rule 'OpenSSH-Server-In-TCP' has been created and exists."
}
Run sshd on an alternate port
Edit the Port line in C:\ProgramData\ssh\sshd_config:
Port 12322
Use the following command to update the Windows Firewall rule to match the port you specified above:
Set-NetFirewallRule -Name 'OpenSSH-Server-In-TCP' -LocalPort 12322
Require publickey and password authentication
Add the following line to C:\ProgramData\ssh\sshd_config
AuthenticationMethods "publickey,password"
publickey authentication for administrators
Public keys for administrators must be put in the file %PROGRAMDATA%/ssh/administrators_authorized_keys. Use the script below to make sure the file has proper permissions.
$acl = Get-Acl C:\ProgramData\ssh\administrators_authorized_keys
$acl.SetAccessRuleProtection($true, $false)
$administratorsRule = New-Object system.security.accesscontrol.filesystemaccessrule("Administrators","FullControl","Allow")
$systemRule = New-Object system.security.accesscontrol.filesystemaccessrule("SYSTEM","FullControl","Allow")
$acl.SetAccessRule($administratorsRule)
$acl.SetAccessRule($systemRule)
$acl | Set-Acl
Stop and Start the sshd service
Stop-Service sshd
Start-Service sshd
netstat -an -p TCP | find '"22"'
Example configuration
Port 12322

#PubkeyAuthentication yes
AuthenticationMethods "publickey,password"
AuthorizedKeysFile	.ssh/authorized_keys

#PasswordAuthentication yes
#PermitEmptyPasswords no

# override default of no subsystems
Subsystem	sftp	sftp-server.exe

Match Group administrators
       AuthorizedKeysFile __PROGRAMDATA__/ssh/administrators_authorized_keys
Use PowerShell as default interpreter
# Check current value of registry key
Get-ItemProperty -Path "HKLM:\SOFTWARE\OpenSSH" -Name DefaultShell
# Legacy PowerShell
New-ItemProperty -Path "HKLM:\SOFTWARE\OpenSSH" -Name DefaultShell -Value "C:\Windows\System32\WindowsPowerShell\v1.0\powershell.exe" -PropertyType String -Force
# PowerShell v7
New-ItemProperty -Path "HKLM:\SOFTWARE\OpenSSH" -Name DefaultShell -Value "C:\Program Files\PowerShell\7\pwsh.exe" -PropertyType String -Force
# Delete registry key to revert to traditional command line
Remove-ItemProperty -Path "HKLM:\SOFTWARE\OpenSSH" -Name DefaultShell
#end
PowerShell
Active Directory
Get-SMBOpenFile
Basics
Expanding objects
Much of the data we receive from cmdlets are objects that require further manipulation to get to the data we're looking for.
# Connect to Microsoft Graph
Connect-MgGraph -Scopes "Mail.Read"

# Define the user and folder details
$userId = "user@domain.com"
$mailFolderId = "folder-id-here"

# Get the messages in the specified folder
$messages = Get-MgUserMailFolderMessage -UserId $userId -MailFolderId $mailFolderId

# Format the output to expand sender, from, and include subject
$messages | Select-Object -Property Id,ReceivedDateTime,From,Sender,Subject | Format-List
Below is example output of the above script:
# example output without object expansion
# note the un-expanded values for From and Sender
Id                   : [REDACTED_GUID]
ReceivedDateTime     : MM/DD/YYYY 2:52:35 AM
Subject              : [REDACTED_SUBJECT]
From                 : Microsoft.Graph.PowerShell.Models.MicrosoftGraphRecipient
Sender               : Microsoft.Graph.PowerShell.Models.MicrosoftGraphRecipient
The actual data we're looking for related to From and Sender is in the following expansions:
From.EmailAddress.Name
From.EmailAddress.Address
Sender.EmailAddress.Name
Sender.EmailAddress.Address
Below is an example of how to accomplish that in the Select-Object statement:
# Connect to Microsoft Graph
Connect-MgGraph -Scopes "Mail.Read"

# Define the user and folder details
$userId = "user@domain.com"
$mailFolderId = "folder-id-here"

# Get the messages in the specified folder
$messages = Get-MgUserMailFolderMessage -UserId $userId -MailFolderId $mailFolderId

# Format the output to expand sender, from, and include subject
$messages | Select-Object -Property Subject,
             @{Name="SenderName";Expression={$_.Sender.EmailAddress.Name}},
             @{Name="SenderEmail";Expression={$_.Sender.EmailAddress.Address}},
             @{Name="FromName";Expression={$_.From.EmailAddress.Name}},
             @{Name="FromEmail";Expression={$_.From.EmailAddress.Address}} |
             Format-List
The output is not actual useful data, rather than the name of the object type that was returned:
Id                : [REDACTED_GUID]
ReceivedDateTime  : MM/DD/YYYY 2:52:35 AM
Subject           : Weekly Duo Report
SenderName        : Security Team
SenderEmail       : security@domain.com
FromName          : Security Team
FromEmail         : security@domain.com
Using variables in -Filter statements
Example of using a variable in a -Filter statement with the Get-ADGroup cmdlet. Note this cmdlet doesn't properly throw exceptions that can be handled by a try / catch block, so we have to use a Filter statement and check to see if anything was returned.
# Assign group name we're looking for to a variable
$GroupName = "Administrators"

# Get-ADGroup doesn't throw exceptions properly, so we have to work around this since we can't use try / catch
$Group = Get-ADGroup -Filter "Name -eq '$GroupName'" -Properties members

If ($Group -eq $null) {
  "# $($GroupName) - group not found!!!"
} else {
  "# $($GroupName)"
}
Errors and Solutions
This page contains a list of common PowerShell errors and their solutions.
Invoke-WebRequest : The request was aborted: Could not create SSL/TLS secure channel.
The cause of the error is that PowerShell, by default, uses TLS 1.0 to make https requests. TLS 1.0 has been broken for a long time now and is no longer supported by most websites. You can change this behavior with running any of the below command to use all protocols. You can also specify single protocol.
[Net.ServicePointManager]::SecurityProtocol = "Tls12"[Net.ServicePointManager]::SecurityProtocol = [Net.SecurityProtocolType]::Tls, [Net.SecurityProtocolType]::Tls11, [Net.SecurityProtocolType]::Tls12, [Net.SecurityProtocolType]::Ssl3
[Net.ServicePointManager]::SecurityProtocol = "Tls, Tls11, Tls12, Ssl3"Restart-Computer : Failed to restart the computer COMPUTERNAME with the following error message: A system shutdown is in progress.
12/23/2024
A server this morning wouldn't respond to CTRL-ALT-DEL requests, remote Event Viewer requests, but we were able to access it via remote a PowerShell session. When we issued the Restart-Computer cmdlet, the error response was that a system shutdown is in progress. Suggestions on the web were to kill any lsass and winlogon processes.
Killing the lsass process did the trick this morning and the server rebooted as expected afterwards.
# list all lsass processes
Get-Process -IncludeUserName | Where-Object {$_.ProcessName -Like 'lsass'}
# to actually stop all lsass processes
Get-Process -IncludeUserName | Where-Object {$_.ProcessName -Like 'lsass'} | Stop-Process
#end
Firewall management
List firewall rules with ICMP in the DisplayName
Get-NetFirewallRule | Where-Object DisplayName -Like "*ICMP*" | Sort-Object Enabled,Name | Format-Table
Enable ICMP Echo Request
Set-NetFirewallRule -DisplayName "File and Printer Sharing (Echo Request - ICMPv4-In)" -enabled True
Set-NetFirewallRule -DisplayName "File and Printer Sharing (Echo Request - ICMPv6-In)" -enabled True
Group Policy and PowerShell
You can manage Group Policy via PowerShell... who knew!? 🤣
Listing GPOs
Get-GPO -All | Sort-Object -Property DisplayName | FT -Property DisplayName,Owner,GpoStatus,DescriptionGet-GPO -All -Domain domain.loc -Server dc1.domain.loc | Sort-Object -Property DisplayName | FT -Property DisplayName,Owner,GpoStatus,DescriptionGenerating GPO reports
# Generate a GPO Report for a single named GPO
$gpoName = "PowerShell Logging"
Get-GPO -All | Where-Object { $_.DisplayName -eq $gpoName } | ForEach-Object {
  $reportPath = "C:\GPOReports\" + $_.DisplayName + ".html"
  Get-GPOReport -GUID $_.ID -ReportType HTML -Path "$($reportPath)"
}
# Generate GPO reports for all GPOs in the current domain
$queryDomain = $env:USERDNSDOMAIN
$queryServer = ($env:LOGONSERVER).replace("\\","") + "." + $env:USERDNSDOMAIN
Get-GPO -All -Domain $queryDomain -Server $queryServer | Sort-Object -Property DisplayName | ForEach-Object {
$reportPath = "C:\GPOReports\" + $_.DomainName + " - " + $_.DisplayName.replace("/","_") + ".html"
"Generating report for $($_.DisplayName) in $($reportPath)..."
Get-GPOReport -Domain $queryDomain -Server $queryServer -GUID $_.ID -ReportType HTML -Path "$($reportPath)"
}#end
Querying Event Logs
I noticed that there is a huge speed difference between using an XML Query and PowerShell Get-EventLog piped through Where-Object to filter event logs. Thanks to this article, I learned how to use the XML Query via PowerShell, so you get the best of both worlds.
Know your version
Here's different commands that will show you which version PowerShell you're running.
$PSVersionTable.PSVersion

Get-Host

$host

$host.version
General concepts
There are two different cmdlets for accessing Windows Event Logs. Get-WinEvent is a newer version of Get-EventLog.
Get-WinEvent
- You have access to more information
- Because you have more information, it might take more effort to filter the data
Get-EventLog
- One clear advantage: you can use the -After and -Before attributes to easily filter results by date
Filtering results
If you want to know how to filter the results, simply pipe the cmdlet to Get-Member:
Get-EventLog system -newest 1 | Get-MemberThe output of the command clearly shows you the methods and properties returned:
PS C:\> Get-EventLog system -newest 1 | Get-Member


   TypeName: System.Diagnostics.EventLogEntry#system/nhi/1074012975

Name                      MemberType     Definition
----                      ----------     ----------
Disposed                  Event          System.EventHandler Disposed(System.Object, System.EventArgs)
CreateObjRef              Method         System.Runtime.Remoting.ObjRef CreateObjRef(type requestedType)
Dispose                   Method         void Dispose(), void IDisposable.Dispose()
Equals                    Method         bool Equals(System.Diagnostics.EventLogEntry otherEntry), bool Equals(System.Object obj)
GetHashCode               Method         int GetHashCode()
GetLifetimeService        Method         System.Object GetLifetimeService()
GetObjectData             Method         void ISerializable.GetObjectData(System.Runtime.Serialization.SerializationInfo info, System.Runtime.Serialization.StreamingContext context)
GetType                   Method         type GetType()
InitializeLifetimeService Method         System.Object InitializeLifetimeService()
ToString                  Method         string ToString()
Category                  Property       string Category {get;}
CategoryNumber            Property       int16 CategoryNumber {get;}
Container                 Property       System.ComponentModel.IContainer Container {get;}
Data                      Property       byte[] Data {get;}
EntryType                 Property       System.Diagnostics.EventLogEntryType EntryType {get;}
Index                     Property       int Index {get;}
InstanceId                Property       long InstanceId {get;}
MachineName               Property       string MachineName {get;}
Message                   Property       string Message {get;}
ReplacementStrings        Property       string[] ReplacementStrings {get;}
Site                      Property       System.ComponentModel.ISite Site {get;set;}
Source                    Property       string Source {get;}
TimeGenerated             Property       datetime TimeGenerated {get;}
TimeWritten               Property       datetime TimeWritten {get;}
UserName                  Property       string UserName {get;}
EventID                   ScriptProperty System.Object EventID {get=$this.get_EventID() -band 0xFFFF;}
Saving event logs to file
# save last 24 hours of system logs
wevtutil.exe epl System "$($env:COMPUTERNAME)_System_Last24Hours.evtx" /q:"*[System[TimeCreated[timediff(@SystemTime) <= 86400000]]]" /ow:true
Get-EventLog Examples
# Show available event logs and stats
Get-EventLog -List
# get the most recent 10 system log entries
# just change the LogName from System to Application, Security, etc. to access other logs
Get-EventLog -LogName System -Newest 10# get all system logs from the last 4 hours
Get-EventLog -LogName System -After (Get-Date).AddHours(-4)# get all system logs from the last 24 hours
Get-EventLog -LogName System -After (Get-Date).AddDays(-1)# View specific event using the event Index
Get-EventLog -LogName System -Index [Event_Index_Number] | Format-List# get the most recent 10 entries from a specific source
Get-EventLog -LogName System -Source Kerberos -Newest 10
Get-EventLog -LogName System -Source Microsoft-Windows-WLAN-AutoConfig -Newest 10# Get system logs from the last 24 hours from Source WLAN-AutoConfig
Get-EventLog -LogName system -After (Get-Date).AddDays(-1) -Source Microsoft-Windows-WLAN-AutoConfig# get the most recent 10 Error entries
Get-EventLog -LogName Application -EventType Error -Newest 10
Get-EventLog -LogName Security -EventType Error -Newest 10
Get-EventLog -LogName System -EventType Error -Newest 10# Get list of Event Log Sources from the System log from the last 8 hours sorted by log count
Get-EventLog -LogName System -after (Get-Date).AddHours(-8) | Group-Object -Property Source -NoElement | Select-Object -Property Count, Name | Sort-Object -Descending Count# Find logins in the last 24 hours
Get-EventLog system -after (get-date).AddDays(-1) | where {$_.InstanceId -eq 7001}
# Find last computer start
$today = get-date -Hour 0 -Minute 0;
Get-EventLog system -after $today | sort -Descending | select -First 1# Find logins and logoffs in the last 7 days
$logs = get-eventlog system -source Microsoft-Windows-Winlogon -After (Get-Date).AddDays(-7);
$res = @(); ForEach ($log in $logs) {if($log.instanceid -eq 7001) {$type = "Logon"} Elseif ($log.instanceid -eq 7002){$type="Logoff"} Else {Continue} $res += New-Object PSObject -Property @{Time = $log.TimeWritten; "Event" = $type; User = (New-Object System.Security.Principal.SecurityIdentifier $Log.ReplacementStrings[1]).Translate([System.Security.Principal.NTAccount])}};
$resGet-WinEvent Examples
# Get user Logon / Logoff events
Get-WinEvent -FilterHashtable @{
   LogName='System'
   ProviderName='Microsoft-Windows-Winlogon'
   ID=7001,7002
}
Get-WinEvent -FilterHashtable @{
LogName='Application'
ProviderName='.NET Runtime'
Keywords=36028797018963968
ID=1023
Level=2
}Formatting output
You can see what formatters are available on any system using the following command
Get-Command -Verb Format -Module Microsoft.PowerShell.UtilityBelow is the output on Windows 11 as of 10/31/2023
PS C:\> Get-Command -Verb Format -Module Microsoft.PowerShell.Utility

CommandType     Name                                               Version    Source
-----------     ----                                               -------    ------
Function        Format-Hex                                         3.1.0.0    Microsoft.PowerShell.Utility
Cmdlet          Format-Custom                                      3.1.0.0    Microsoft.PowerShell.Utility
Cmdlet          Format-List                                        3.1.0.0    Microsoft.PowerShell.Utility
Cmdlet          Format-Table                                       3.1.0.0    Microsoft.PowerShell.Utility
Cmdlet          Format-Wide                                        3.1.0.0    Microsoft.PowerShell.Utility
You also have access to the following cmdlets for other output formats
Export-CliXml
# Export-Clixml exports an XML representation of an object or objects and stores it in a file
Get-Acl C:\Windows | Export-CliXml -Path .\c-windows-acl.xml
# You can use Import-CliXml to save the stored object or objects back to a variable
$WindowsFolderACL = Import-CliXml -Path .\c-windows-acl.xmlExport-Csv
# Export-Csv - Add an example laterRedirecting data with Out-* cmdlets
Out-Host -Paging

Get-Process | Out-Host -Paging | Format-List

Get-Process | Format-List | Out-Host -Paging

Get-Command | Out-Null

Get-Command Get-Command | Out-Printer -Name 'Microsoft Office Document Image Writer'

Get-Process | Out-File -FilePath C:\temp\processlist.txt

Get-Command | Out-File -FilePath c:\temp\output.txt -Width 2147483647
Get-EventLog -LogName System -After (Get-Date).AddDays(-1) -EntryType Error | Out-GridViewGrouping output
Remember to use the Get-Member cmdlet to see what properties you can use with Sort-Object and -GroupBy
Get-Service -Name win* | Sort-Object StartType | Format-Table -GroupBy StartType -AutoSizePS C:\> Get-Service -Name win* | Sort-Object StartType | Format-Table -GroupBy StartType -AutoSize
StartType: Automatic
Status Name DisplayName
------ ---- -----------
Running Winmgmt Windows Management Instrumentation
Running WinDefend Microsoft Defender Antivirus Service
StartType: Manual
Status Name DisplayName
------ ---- -----------
Stopped WinRM Windows Remote Management (WS-Management)
Running WinHttpAutoProxySvc WinHTTP Web Proxy Auto-Discovery ServiceQuerying for specific logs
System uptime related logs
For the actual current system uptime via PowerShell, look here. The code below will show actual related event log entries.
Use this XML Filter in the Windows Event Viewer to create a custom filtered view of Kernel-General "The operating system started at system time..." events.
| Event ID | Description |
| 12 | |
| 13 | |
| 41 | The system has rebooted without cleanly shutting down first. This error could be caused if the system stopped responding, crashed, or lost power unexpectedly. |
| 1074 | Logged when an app (ex: Windows Update) causes the system to restart, or when a user initiates a restart or shutdown. |
| 6006 | Logged as a clean shutdown. It gives the message "The Event log service was stopped". |
| 6008 | Logged as a dirty shutdown. It gives the message "The previous system shutdown at time on date was unexpected". |
$query = @"
<QueryList>
  <Query Id="0" Path="System">
    <Select Path="System">*[System[(EventID='12')]]</Select>
    <Select Path="System">*[System[(EventID='13')]]</Select>
    <Select Path="System">*[System[(EventID='41')]]</Select>
    <Select Path="System">*[System[(EventID='1074')]]</Select>
    <Select Path="System">*[System[(EventID='6006')]]</Select>
    <Select Path="System">*[System[(EventID='6008')]]</Select>
  </Query>
</QueryList>
"@

Get-WinEvent -FilterXml $query | Format-List
Finding account lockouts.
XML Query
Use this XML Filter in the Windows Event Viewer to create a custom filtered view displaying account lockouts.
<QueryList>
  <Query Id="0" Path="Security">
    <Select Path="Security">
      *[
        System[(EventID='4740')]
      ]
    </Select>
  </Query>
</QueryList>
PowerShell Script - Slow method
Get-EventLog -LogName Security | Where-Object {$_.EventID -eq 4740} |
   Select-Object -Property TimeGenerated, Source, EventID, InstanceId, Message
PowerShell Script - Fast method
$query = @"
<QueryList>
  <Query Id="0" Path="Security">
    <Select Path="Security">
      *[
        System[(EventID='4740')]
      ]
    </Select>
  </Query>
</QueryList>
"@

Get-WinEvent -FilterXml $query | Format-List
Finding account lockouts for a particular user.
XML Query
Use this XML Filter in the Windows Event Viewer to create a custom filtered view displaying account lockouts for the administrator user.
<QueryList>
  <Query Id="0" Path="Security">
    <Select Path="Security">
      *[
        EventData[Data[@Name='TargetUserName']='administrator']
        and
        System[(EventID='4740')]
      ]
    </Select>
  </Query>
</QueryList>
PowerShell Script - Fast method
$query = @"
<QueryList>
  <Query Id="0" Path="Security">
    <Select Path="Security">
      *[
        EventData[Data[@Name='TargetUserName']='administrator']
        and
        System[(EventID='4740')]
      ]
    </Select>
  </Query>
</QueryList>
"@

Get-WinEvent -FilterXml $query | Format-List
NPS + Azure MFA Logs - XML Query
XML Filter for custom filtered view that suppresses accounting event logs.
<QueryXML>
	<QueryList>
	  <Query Id="0" Path="System">
		<Select Path="System">*[System[Provider[@Name='NPS']]]</Select>
		<Select Path="Security">*[System[Provider[@Name='Microsoft-Windows-Security-Auditing'] and Task = 12552]]</Select>
		<Suppress Path="Security">*[System[Provider[@Name='Microsoft-Windows-Security-Auditing'] and Task = 12552 and (Data='Network Policy Server discarded the accounting request for a user.')]]</Suppress>
		<Select Path="Security">*[System[Provider[@Name='Microsoft-Windows-Security-Auditing']]] and *[EventData[Data[@Name='LogonProcessName'] and (Data='IAS')]]</Select>
		<Select Path="AuthNOptCh">*</Select>
		<Select Path="AuthZAdminCh">*</Select>
		<Select Path="AuthZOptCh">*</Select>
	  </Query>
	</QueryList>
</QueryXML>
NPS Logs - XML Query
XML Filter for custom filtered view that suppresses accounting event logs.
<QueryXML>
	<QueryList>
	  <Query Id="0" Path="System">
		<Select Path="System">*[System[Provider[@Name='NPS']]]</Select>
		<Select Path="Security">*[System[Provider[@Name='Microsoft-Windows-Security-Auditing'] and Task = 12552]]</Select>
		<Suppress Path="Security">*[System[Provider[@Name='Microsoft-Windows-Security-Auditing'] and Task = 12552 and (Data='Network Policy Server discarded the accounting request for a user.')]]</Suppress>
		<Select Path="Security">*[System[Provider[@Name='Microsoft-Windows-Security-Auditing']]] and *[EventData[Data[@Name='LogonProcessName'] and (Data='IAS')]]</Select>
	  </Query>
	</QueryList>
</QueryXML>
Disk logs
XML Query
XML Filter for custom filtered view for disk events.
<QueryList>
  <Query Id="0" Path="System">
    <Select Path="System">*[System[Provider[@Name='disk']]]</Select>
  </Query>
</QueryList>
VPN Client Logs
PowerShell Query
$query = @"
<QueryList>
  <Query Id="0" Path="Application">
    <Select Path="Application">*[System[Provider[@Name='RasAuto' or @Name='RasCfg' or @Name='RasClient' or @Name='Rasman' or @Name='Microsoft-Windows-RasServer' or @Name='Microsoft-Windows-RasSstp' or @Name='Microsoft-Windows-EapMethods-RasChap' or @Name='Microsoft-Windows-NcdAutoSetup' or @Name='Microsoft-Windows-NCSI' or @Name='Microsoft-Windows-NetworkProfile']]]</Select>
    <Select Path="System">*[System[Provider[@Name='RasAuto' or @Name='RasCfg' or @Name='RasClient' or @Name='Rasman' or @Name='Microsoft-Windows-RasServer' or @Name='Microsoft-Windows-RasSstp' or @Name='Microsoft-Windows-EapMethods-RasChap' or @Name='Microsoft-Windows-NcdAutoSetup' or @Name='Microsoft-Windows-NCSI' or @Name='Microsoft-Windows-NetworkProfile']]]</Select>
  </Query>
</QueryList>
"@

$vpnEvents = Get-WinEvent -FilterXml $query -Oldest

# Displays events from the last 24 hours grouped by ProviderName
# This is the best view for easily browsing
$vpnEvents | ?{$_.TimeCreated -ge (Get-Date).Addhours(-24)}
# Displays events from the last 24 hours as a time sorted list
$vpnEvents | ?{$_.TimeCreated -ge (Get-Date).Addhours(-24)} | Format-ListXML Query
<QueryList>
  <Query Id="0" Path="Application">
    <Select Path="Application">*[System[Provider[@Name='RasAuto' or @Name='RasCfg' or @Name='RasClient' or @Name='Rasman' or @Name='Microsoft-Windows-RasServer' or @Name='Microsoft-Windows-RasSstp' or @Name='Microsoft-Windows-EapMethods-RasChap' or @Name='Microsoft-Windows-NcdAutoSetup' or @Name='Microsoft-Windows-NCSI' or @Name='Microsoft-Windows-NetworkProfile']]]</Select>
    <Select Path="System">*[System[Provider[@Name='RasAuto' or @Name='RasCfg' or @Name='RasClient' or @Name='Rasman' or @Name='Microsoft-Windows-RasServer' or @Name='Microsoft-Windows-RasSstp' or @Name='Microsoft-Windows-EapMethods-RasChap' or @Name='Microsoft-Windows-NcdAutoSetup' or @Name='Microsoft-Windows-NCSI' or @Name='Microsoft-Windows-NetworkProfile']]]</Select>
  </Query>
</QueryList>
Searching for Wired/WLAN-AutoConfig related errors
Wired-AutoConfig
#Powershell
$addhours = 12;

# Setup filter for error only logs
$filter = @{ LogName = "Microsoft-Windows-Wired-AutoConfig/Operational"
StartTime = [DateTime]::Now.AddHours($addhours*-1)
EndTime = [DateTime]::Now
Level = 2
}

Write-Host ([DateTime]::Now.AddHours($addhours*-1))

Write-Host ([DateTime]::Now)

$Events = Get-Winevent -FilterHashtable $filter


# Parse out the event message data
ForEach ($Event in $Events) {
	# Convert the event to XML
	$eventXML = [xml]$Event.ToXml()
	# Iterate through each one of the XML message properties
	For ($i=0; $i -lt $eventXML.Event.EventData.Data.Count; $i++) {
		# Append these as object properties
		Add-Member -InputObject $Event -MemberType NoteProperty -Force -Name $eventXML.Event.EventData.Data[$i].name -Value $eventXML.Event.EventData.Data[$i].'#text'
	}
}
# Show results stored in variable
$Events | Format-List
WLAN-AutoConfig
#Powershell
$addhours = 12;

# Setup filter for error only logs
$filter = @{ LogName = "Microsoft-Windows-WLAN-AutoConfig/Operational"
StartTime = [DateTime]::Now.AddHours($addhours*-1)
EndTime = [DateTime]::Now
Level = 2
}

Write-Host ([DateTime]::Now.AddHours($addhours*-1))

Write-Host ([DateTime]::Now)

$Events = Get-Winevent -FilterHashtable $filter


# Parse out the event message data
ForEach ($Event in $Events) {
	# Convert the event to XML
	$eventXML = [xml]$Event.ToXml()
	# Iterate through each one of the XML message properties
	For ($i=0; $i -lt $eventXML.Event.EventData.Data.Count; $i++) {
		# Append these as object properties
		Add-Member -InputObject $Event -MemberType NoteProperty -Force -Name $eventXML.Event.EventData.Data[$i].name -Value $eventXML.Event.EventData.Data[$i].'#text'
	}
}

$Events | Select-Object id, MachineName, ProcessId,TimeCreated, Adapter, LocalMac, SSID, Cipher, Auth, PeerMac | Format-List
# Show results stored in variable
$Events | Select-Object id, MachineName, ProcessId,TimeCreated, Adapter, LocalMac, SSID, Cipher, Auth, PeerMac | Format-List
Show available wireless profiles and available wireless networks
# show profiles
netsh wlan show profiles

# show available networks
netsh wlan show networks
Duo Security Events
# Get Duo Security related events
Get-WinEvent -FilterHashtable @{
   LogName='Application'
   ProviderName='Duo Security'
}
Internet availability via Universal Telemetry Client
$query = @"
<QueryList>
  <Query Id="0" Path="Microsoft-Windows-UniversalTelemetryClient/Operational">
    <Select Path="Microsoft-Windows-UniversalTelemetryClient/Operational">
      *[System[(EventID=55)]] and *[EventData[Data[@Name='State'] and (Data='false')]]
    </Select>
    <Select Path="Microsoft-Windows-UniversalTelemetryClient/Operational">
      *[System[(EventID=55)]] and *[EventData[Data[@Name='State'] and (Data='true')]]
    </Select>
  </Query>
</QueryList>
"@

$Events = Get-WinEvent -FilterXml $query -Oldest

$Events
Show network disconnects
$query = @"
<QueryList>
  <Query Id="0" Path="Microsoft-Windows-NetworkProfile/Operational">
    <Select Path="Microsoft-Windows-NetworkProfile/Operational">
      *[System[(EventID=10001)]]
    </Select>
  </Query>
</QueryList>
"@

$Events = Get-WinEvent -FilterXml $query -Oldest

$Events
# alternate method with StartTime
$startDate = (Get-Date).AddDays(-7)
$events = Get-WinEvent -FilterHashtable @{
LogName = 'Microsoft-Windows-NetworkProfile/Operational'
ID = 10001
StartTime = $startDate
}
$events | Format-Table -AutoSizeSpecific Network Profile Events
Get-WinEvent -LogName "Microsoft-Windows-NetworkProfile/Operational" -MaxEvents 50 | Format-Table TimeCreated, Id, Message -AutoSize# dump event logs to a CSV file, replace line feeds with semi-colons
Get-WinEvent -LogName "Microsoft-Windows-NetworkProfile/Operational" -Oldest |
Select-Object TimeCreated, ProviderName, Id, @{Name='Message';Expression={$_.Message -replace "`r?`n", "; "}} |
Export-Csv -Path "$($env:COMPUTERNAME)-WinEvent-NetworkProfile-Operational.csv" -NoTypeInformationMicrosoft-Windows-Kernel-Power Events
Get-WinEvent -FilterHashtable @{ProviderName = 'Microsoft-Windows-Kernel-Power'; LogName = 'System'} |
    Select-Object TimeCreated, ProviderName, Id, @{Name='Message';Expression={$_.Message -replace "`r?`n", "; "}} |
    Export-Csv -Path "$($env:COMPUTERNAME)-Windows-Kernel-Power.csv" -NoTypeInformation
netsh wlanreport
netsh will generate an HTML report containing logs of the last 3 days regarding the wireless network interfaces of a device.
# The results will be stored here: C:\ProgramData\Microsoft\Windows\WlanReport\wlan-report-latest.html
netsh wlan show wlanreport
$sourceDir = "C:\ProgramData\Microsoft\Windows\WlanReport"
$sourceFile = "$($sourceDir)\wlan-report-latest.html"
$newFile = "$($sourceDir)\wlan-report-latest_$($env:COMPUTERNAME)_$(Get-Date -Format "yyyyMMdd-HHmmss").html"
netsh wlan show wlanreport duration="1"
copy "$($sourceFile)" "$($newFile)"
Sources: 1
Snippets
Logged in users
$loggedInUsers = (query user) -split "\n" -replace '\s\s+', ';' | convertfrom-csv -Delimiter ';'# example output
PS C:\> $loggedInUsers | Format-Table
USERNAME SESSIONNAME ID STATE IDLE TIME LOGON TIME
-------- ----------- -- ----- --------- ----------
joebob console 15 Active 6:09 1/12/1979 3:33 AM
PS C:\> $loggedInUsers.USERNAME
joebobIPv6 to MAC address
$ipv6Address = "fe80::9657:a5ff:fe17:aeac"

# First attempt - shows all entries
Get-NetNeighbor -AddressFamily IPv6 | Where-Object {$_.IPAddress -eq "$($ipv6Address)"}

# Second attempt - only show Permananet entries
Get-NetNeighbor -AddressFamily IPv6 | Where-Object {($_.State -eq 'Permanent') -And ($_.IPAddress -eq "$($ipv6Address)")}

# Show just the Windows MAC address format with dashes
(Get-NetNeighbor -AddressFamily IPv6 | Where-Object {($_.State -eq 'Permanent') -And ($_.IPAddress -eq "$($ipv6Address)")}).LinkLayerAddress

# Normal format with colons
(Get-NetNeighbor -AddressFamily IPv6 | Where-Object {($_.State -eq 'Permanent') -And ($_.IPAddress -eq "$($ipv6Address)")}).LinkLayerAddress -replace '-', ':'
While a file exists or not
# while a file exists
While (Test-Path C:\Temp\File_I_Want_Gone.txt -ErrorAction SilentlyContinue) {
  # Do something here while the file exists
}
# while a file doesn't exists
While (!(Test-Path C:\Temp\File_I_Want_Gone.txt -ErrorAction SilentlyContinue)) {
# Do something here while the file doesn't exists
}# while a file exists
While (Test-Path C:\Temp\File_I_Want_Gone.txt -ErrorAction SilentlyContinue) {
# try to delete the file, continue silently if we can't
Remove-Item "C:\Temp\File_I_Want_Gone.txt" -ErrorAction SilentlyContinue
# print date each time just to give some sort of feedback on the console
Get-Date
}Testing Microsoft SQL database connectivity
function Test-SQLConnection
{
    [OutputType([bool])]
    Param
    (
        [Parameter(Mandatory=$true,
                    ValueFromPipelineByPropertyName=$true,
                    Position=0)]
        $ConnectionString
    )
    try
    {
        $sqlConnection = New-Object System.Data.SqlClient.SqlConnection $ConnectionString;
        $sqlConnection.Open();
        $sqlConnection.Close();

        return $true;
    }
    catch
    {
        return $false;
    }
}
Test-SQLConnection "Data Source=localhost;database=someDatabase;User ID=bogusTestUser;Password=bogusTestPassword;"[Source]
Pattern matching
# url and ipv4 / ipv6 patterns
$hostnamePattern = "(?:https?://)?(?:www\.)?([^/:]+)"
$ipv4Pattern = "(?:http|https):\/\/((?:[0-9]{1,3}\.){3}[0-9]{1,3})"
$ipv6Pattern = "\[((?:[0-9a-fA-F]{1,4}:){7}[0-9a-fA-F]{1,4}|(?:[0-9a-fA-F]{1,4}:){1,7}:|(?:[0-9a-fA-F]{1,4}:){1,6}:[0-9a-fA-F]{1,4}|(?:[0-9a-fA-F]{1,4}:){1,5}(:[0-9a-fA-F]{1,4}){1,2}|(?:[0-9a-fA-F]{1,4}:){1,4}(:[0-9a-fA-F]{1,4}){1,3}|(?:[0-9a-fA-F]{1,4}:){1,3}(:[0-9a-fA-F]{1,4}){1,4}|(?:[0-9a-fA-F]{1,4}:){1,2}(:[0-9a-fA-F]{1,4}){1,5}|[0-9a-fA-F]{1,4}:((:[0-9a-fA-F]{1,4}){1,6})|:((:[0-9a-fA-F]{1,4}){1,7}|:)|fe80:(:[0-9a-fA-F]{0,4}){0,4}%[0-9a-zA-Z]{1,}|::(ffff(:0{1,4}){0,1}:){0,1}((25[0-5]|(2[0-4]|1{0,1}[0-9]){0,1}[0-9])\.){3}(25[0-5]|(2[0-4]|1{0,1}[0-9]){0,1}[0-9]))\]"

# example use - creating a WSDLocation URL Extractoratorinator
function WSDLocationURLExtractAddress {
    <#
    .DESCRIPTION
    Given a WSD Location / LocationInformation URL, attempt to extract and return the IPv4 or IPv6 address.
    #>
    param (
        [string]$WSDLocation
    )

    $ipv4Pattern = "(?:http|https):\/\/((?:[0-9]{1,3}\.){3}[0-9]{1,3})"
    $ipv6Pattern = "\[((?:[0-9a-fA-F]{1,4}:){7}[0-9a-fA-F]{1,4}|(?:[0-9a-fA-F]{1,4}:){1,7}:|(?:[0-9a-fA-F]{1,4}:){1,6}:[0-9a-fA-F]{1,4}|(?:[0-9a-fA-F]{1,4}:){1,5}(:[0-9a-fA-F]{1,4}){1,2}|(?:[0-9a-fA-F]{1,4}:){1,4}(:[0-9a-fA-F]{1,4}){1,3}|(?:[0-9a-fA-F]{1,4}:){1,3}(:[0-9a-fA-F]{1,4}){1,4}|(?:[0-9a-fA-F]{1,4}:){1,2}(:[0-9a-fA-F]{1,4}){1,5}|[0-9a-fA-F]{1,4}:((:[0-9a-fA-F]{1,4}){1,6})|:((:[0-9a-fA-F]{1,4}){1,7}|:)|fe80:(:[0-9a-fA-F]{0,4}){0,4}%[0-9a-zA-Z]{1,}|::(ffff(:0{1,4}){0,1}:){0,1}((25[0-5]|(2[0-4]|1{0,1}[0-9]){0,1}[0-9])\.){3}(25[0-5]|(2[0-4]|1{0,1}[0-9]){0,1}[0-9]))\]"
    $hostnamePattern = "(?:https?://)?(?:www\.)?([^/:]+)"

    $ipv4Match = [regex]::Match($WSDLocation, $ipv4Pattern)
    $ipv6Match = [regex]::Match($WSDLocation, $ipv6Pattern)
    $hostnameMatch = [regex]::Match($WSDLocation, $hostnamePattern)

    $retval = ""
    if ($ipv4Match.Success) {
        $retval = ($ipv4Match[0].Value -split '://')[1]
    } elseif ($ipv6Match.Success) {
        $retval = ($ipv6Match[0].Value).Trim('[',']').Split('%')[0]
    } elseif ($hostnameMatch.Success) {
        $retval = ($hostnameMatch[0].Value -split '://')[1]
    } else {
        $retval = $null
    }
    return $retval
}
Useful PowerShell Commands
Placeholder
Select-String is the Grep equivalent
Examples:
# Searching for multiple patterns at the same time
Select-String -Path "*.txt" -Pattern "Pattern1","Pattern2","Pattern3"

# Only return the first 10 results
Select-String -Path "*.txt" -Pattern "Pattern1","Pattern2","Pattern3" | Select-Object -First 10

# Searching for IP addresses
Select-String -Path "*.log" -Pattern '\b\d{1,3}\.\d{1,3}\.\d{1,3}\.\d{1,3}\b' | Select-Object -First 10
Uptime
The script below will give you the uptime in any version of PowerShell.
Get-CimInstance -ClassName Win32_OperatingSystem | Select LastBootUpTimeThe Get-Uptime cmdlet was introduced in PowerShell 6.0.
Get-UptimeFormat processes by start date
This command will show a lot of errors if you're not running PowerShell as Administrator.
Get-Process | Sort-Object StartTime | Format-Table -View StartTimeActive Directory Account Information
This command will show you the date of the last password set for a user.
Get-ADUser -Identity [USERNAME] -properties * | select accountexpirationdate, accountexpires, accountlockouttime, badlogoncount, padpwdcount, lastbadpasswordattempt, lastlogondate, lockedout, passwordexpired, passwordlastset, pwdlastset | format-listSources:
PowerShell Format-Table
Active Directory Account Password Expiration
The old way:
net use userName /domainThe PowerShell way:
Get-ADUser -identity userName –Properties "DisplayName", "msDS-UserPasswordExpiryTimeComputed" |
Select-Object -Property "Displayname",@{Name="ExpiryDate";Expression={[datetime]::FromFileTime($_."msDS-UserPasswordExpiryTimeComputed")}}
Active Directory OU Account Password Expiration
Get-ADUser -filter * -SearchBase "OU=Management,OU=ADPRO Users,DC=ad,DC=activedirectorypro,DC=com" –Properties "DisplayName", "msDS-UserPasswordExpiryTimeComputed" | Select-Object -Property "Displayname",@{Name="ExpiryDate";Expression={[datetime]::FromFileTime($_."msDS-UserPasswordExpiryTimeComputed")}}View physical network interfaces
# Show all physical devices
Get-NetAdapter -Physical | Sort-Object -Property MediaType,Name | Format-Table ifIndex,MediaType,InterfaceMetric,Name,InterfaceDescription,Status,MacAddress,LinkSpeed
Get interface metrics
# IPv4 - Display interfaces sorted by metric and alias
Get-NetIPInterface -AddressFamily IPv4 | Sort InterfaceMetric,InterfaceAlias

# IPv6 - Display interfaces sorted by metric and alias
Get-NetIPInterface -AddressFamily IPv6 | Sort InterfaceMetric,InterfaceAlias

# All - Display interfaces sorted by metric and alias
Get-NetIPInterface | Sort InterfaceMetric,InterfaceAlias
Set interface metrics
The following commands will set Ethernet interfaces to be preferred over wireless interfaces by manipulating the InterfaceMetric of each device. If there are more than one Ethernet and/or Wireless interface on the machine, you may want to adjust these metrics further to provide a more detailed use order.
Ethernet first, then wireless:
# Set Ethernet devices interface metric to 11
Get-NetAdapter -Physical | Where {$_.MediaType -eq "802.3"} | Set-NetIPInterface -InterfaceMetric 11

# Set Wireless devices interface metric to 12
Get-NetAdapter -Physical | Where {$_.MediaType -eq "Native 802.11"} | Set-NetIPInterface -InterfaceMetric 12
Wireless first, then Ethernet:
# Set Wireless devices interface metric to 12
Get-NetAdapter -Physical | Where {$_.MediaType -eq "Native 802.11"} | Set-NetIPInterface -InterfaceMetric 12

# Set Ethernet devices interface metric to 13
Get-NetAdapter -Physical | Where {$_.MediaType -eq "802.3"} | Set-NetIPInterface -InterfaceMetric 13
Is your Office installation 32 or 64 bit?
# .platform value will be either x86 for 32-bit or x64 for 64-bit
$officeCheck = (Get-ItemProperty -Path "HKLM:\SOFTWARE\Microsoft\Office\ClickToRun\Configuration").platform

if ($officeCheck -eq 'x64'){
    Write-Output "Office is 64 bit."
}
else {
    Write-Output "Office is 32 bit."
}
Exporting Event Logs using Out-HTMLView
You can use the Out-HTMLView module to view or save and view later.
$executionPolicy = Get-ExecutionPolicy
#Set-ExecutionPolicy -Scope Process -ExecutionPolicy Bypass -Force
Set-ExecutionPolicy -Scope Process -ExecutionPolicy Unrestricted -Force

try { Import-Module -Name PSWriteHTML }
catch {
  Install-Module -Name PSWriteHTML
  Import-Module -Name PSWriteHTML
}

$lastHours = -4
$timeStamp = (Get-Date).ToString('yyyyMMdd_HHmmss')
$systemEventLogFile = ("$($env:TEMP)\$($timeStamp)_eventlogs_system_Out-HTMLView.html")
$applicationEventLogFile = ("$($env:TEMP)\$($timeStamp)_eventlogs_system_Out-HTMLView.html")


Get-EventLog -LogName System -After (Get-Date).AddHours($lastHours) | Out-HTMLView -FilePath $systemEventLogFile
Get-EventLog -LogName Application -After (Get-Date).AddHours($lastHours) | Out-HTMLView -FilePath $applicationEventLogFile

Write-Host ("Event Logs for the last $($lastHours) hours saved to the following files:")
Write-Host ("$($systemEventLogFile)")
Write-Host ("$($applicationEventLogFile)")

#end
List installed applications
Get-ItemProperty -Path "HKLM:\Software\WOW6432Node\Microsoft\Windows\CurrentVersion\Uninstall\*", "HKLM:\Software\Microsoft\Windows\CurrentVersion\Uninstall\*", "HKCU:\Software\Microsoft\Windows\CurrentVersion\Uninstall\*" | Where-Object { $_.DisplayName -ne $null } | Select-Object DisplayName, DisplayVersion, InstallDate | Sort-Object -Property DisplayNameList installed Windows Features
Get-WindowsFeature | Where-Object {$_. installstate -eq "installed"}CPU utilization
Get-Counter -ComputerName localhost '\Process(*)\% Processor Time' `
    | Select-Object -ExpandProperty countersamples `
    | Select-Object -Property instancename, cookedvalue `
    | Sort-Object -Property cookedvalue -Descending | Select-Object -First 20 `
    | ft InstanceName,@{L='CPU';E={($_.Cookedvalue/100).toString('P')}} -AutoSize
Get external IP address
The OpenDNS way via PowerShell
$(Resolve-DnsName -Name myip.opendns.com -Server 208.67.222.220).IPAddressThe OpenDNS way via cmd
nslookup myip.opendns.com 208.67.222.220The OpenDNS way using dig (Linux)
dig a myip.opendns.com @208.67.222.220Windows 11 Power Settings
# dump all the settings
powercfg /Q

# show Sleep settings
$hexNumberPattern = '\b0x[a-f0-9]+\b'
$sleepSettings = powercfg /Q | Select-String -Pattern "SUB_SLEEP" -Context 1, 8
$MatchesFound = $sleepSettings | Out-String | Select-String -Pattern $hexNumberPattern -AllMatches
if ($MatchesFound.Matches.Count -eq 5) {
  $ACSleepAfterMinutes = [Convert]::ToInt32($MatchesFound.Matches[3].Value, 16) / 60
  $DCSleepAfterMinutes = [Convert]::ToInt32($MatchesFound.Matches[4].Value, 16) / 60
  Write-Output "Sleep after on power  : $($ACSleepAfterMinutes) minutes"
  Write-Output "Sleep after on battery: $($DCSleepAfterMinutes) minutes"
}
-end
Windows Network Management from the command line
PowerShell
Show relevant settings
# IPv4 and IPv6 - Display interfaces sorted by name, index, address family
Get-NetIPInterface | Sort-Object -Property InterfaceAlias,ifIndex,AddressFamily

# Show current DNS configuration
Get-DnsClientServerAddress | Sort-Object -Property InterfaceAlias,InterfaceIndex,AddressFamily

# IPv4 - Display interfaces sorted by metric and alias
Get-NetIPInterface -AddressFamily IPv4 | Sort InterfaceMetric,InterfaceAlias
Reset Ethernet and Wireless interfaces to use DHCP
# Ethernet interfaces use DHCP
Get-NetAdapter -Physical | Where {$_.MediaType -eq "802.3"} | Set-NetIPInterface -Dhcp Enabled
Get-NetAdapter -Physical | Where {$_.MediaType -eq "802.3"} | Set-DnsClientServerAddress -ResetServerAddresses
# Wireless interfaces use DHCP
Get-NetAdapter -Physical | Where {$_.MediaType -eq "Native 802.11"} | Set-NetIPInterface -Dhcp Enabled
Get-NetAdapter -Physical | Where {$_.MediaType -eq "Native 802.11"} | Set-DnsClientServerAddress -ResetServerAddresses
DNS Settings Using PowerShell
# Show current DNS configuration
Get-DnsClientServerAddress | Sort-Object -Property InterfaceAlias,InterfaceIndex,AddressFamily
Reset Ethernet and Wireless interfaces to use DHCP for DNS servers
# Reset DNS settings on Ethernet interfaces - Use DHCP for DNS servers
Get-NetAdapter -Physical | Where {$_.MediaType -eq "802.3"} | Set-DnsClientServerAddress -ResetServerAddresses

# Reset DNS settings on Wireless interfaces - Use DHCP for DNS servers
Get-NetAdapter -Physical | Where {$_.MediaType -eq "Native 802.11"} | Set-DnsClientServerAddress -ResetServerAddresses
Use specific DNS servers on Ethernet and Wireless interfaces
IPv4
# Reset DNS settings on Ethernet interfaces - Use DHCP for DNS servers
Get-NetAdapter -Physical | Where {$_.MediaType -eq "802.3"} | Set-DnsClientServerAddress -ServerAddresses ("8.8.8.8","1.1.1.1")

# Reset DNS settings on Wireless interfaces - Use DHCP for DNS servers
Get-NetAdapter -Physical | Where {$_.MediaType -eq "Native 802.11"} | Set-DnsClientServerAddress -ServerAddresses ("8.8.8.8","1.1.1.1")
IPv6
# Ethernet interfaces -> use Google + Cloudflare Public DNS
Get-NetAdapter -Physical | Where {$_.MediaType -eq "802.3"} | Set-DnsClientServerAddress -ServerAddresses ("2001:4860:4860::8888","2606:4700:4700::1111")

# Wireless interfaces -> use Google + Cloudflare Public DNS
Get-NetAdapter -Physical | Where {$_.MediaType -eq "Native 802.11"} | Set-DnsClientServerAddress -ServerAddresses ("2001:4860:4860::8888","2606:4700:4700::1111")
Get interface metrics
# IPv4 - Display interfaces sorted by metric and alias
Get-NetIPInterface -AddressFamily IPv4 | Sort InterfaceMetric,InterfaceAlias

# IPv6 - Display interfaces sorted by metric and alias
Get-NetIPInterface -AddressFamily IPv6 | Sort InterfaceMetric,InterfaceAlias

# All - Display interfaces sorted by metric and alias
Get-NetIPInterface | Sort InterfaceMetric,InterfaceAlias
Set interface metrics
The following commands will set Ethernet interfaces to be preferred over wireless interfaces by manipulating the InterfaceMetric of each device. If there are more than one Ethernet and/or Wireless interface on the machine, you may want to adjust these metrics further to provide a more detailed use order.
# Set Ethernet devices interface metric to 11
Get-NetAdapter -Physical | Where {$_.MediaType -eq "802.3"} | Set-NetIPInterface -InterfaceMetric 11

# Set Wireless devices interface metric to 12
Get-NetAdapter -Physical | Where {$_.MediaType -eq "Native 802.11"} | Set-NetIPInterface -InterfaceMetric 12
netsh
netsh and firewall
# turn off Windows firewall for all profiles
netsh advfirewall set allprofiles state off
netsh wireless
# show wireless LAN interfaces on the system
netsh wlan show interfaces

# show properties of the wireless LAN drivers on the system
netsh wlan show drivers

# show list of networks visible on the system
netsh wlan show networks

# show more detailed information on visible networks
netsh wlan show networks mode=bssid

# show a list of profiles configured on the systme
netsh wlan show profiles
# connect to an SSID using a Profile
netsh wlan connect ssid=[ssid] name=[profile]# disconnect all wireless interfaces
netsh wlan disconnect# PowerShell script to run all of the commands and save the output to a txt file
$outputFile = "$($env:TEMP)\$((Get-Date).ToString('yyyyMMdd_HHmmss'))_netsh_wlan_info_$($env:COMPUTERNAME).output.txt"
$scriptBlock1 = {
# basic information
dir env: | Where-Object {$_.Name -Like 'USER*' -Or $_.Name -Like 'COMPUTERNAME' -Or $_.Name -Like 'LOGONSERVER'}
ipconfig /all
nslookup google.com
# show wireless LAN interfaces on the system
netsh wlan show interfaces
# show properties of the wireless LAN drivers on the system
netsh wlan show drivers
# show list of networks visible on the system
netsh wlan show networks
# show more detailed information on visible networks
netsh wlan show networks mode=bssid
# show a list of profiles configured on the systme
netsh wlan show profiles
# show the rest of the env:
dir env:
}
Invoke-Command -ScriptBlock $scriptBlock1 | Out-File -FilePath $outputFile
Write-Output "netsh wlan output saved the following file: $($outputFile)"Setting IPv4 address using netsh
netsh interface ipv4 show config

# set IPv4 address and dns on an interface using dhcp
netsh interface ipv4 set address name="Ethernet" source=dhcp
netsh interface ipv4 set dns name="Ethernet" source=dhcp

# set IPv4 address on an interface
netsh interface ipv4 set address name="Ethernet" static 10.1.1.84 255.255.255.0 10.1.1.1

# set DNS servers on an interface
netsh interface ipv4 set dns name="Ethernet" static 8.8.8.8 1.1.1.1
#end
Resource Usage
SYSTEMINFO
You can cheat and use good old SYSTEMINFO from any command line. This will give you fairly comprehensive system information.
systeminfo
Memory Usage
Again you can cheat, use SYSTEMINFO and filter the output:
systeminfo | Select-String 'Memory:'The code snippet below will work with PowerShell 3.0 and newer
if ([Environment]::Is64BitOperatingSystem) {
  #64 bit logic here
  get-process | Group-Object -Property ProcessName |
  % {
      [PSCustomObject]@{
          ProcessName = $_.Name
          Mem_MB = [math]::Round(($_.Group|Measure-Object WorkingSet64 -Sum).Sum / 1MB, 0)
          ProcessCount = $_.Count
      }
  } | sort -desc Mem_MB | Select-Object -First 25
} else {
  #32 bit logic here
  get-process | Group-Object -Property ProcessName |
  % {
      [PSCustomObject]@{
          ProcessName = $_.Name
          Mem_MB = [math]::Round(($_.Group|Measure-Object WorkingSet -Sum).Sum / 1MB, 0)
          ProcessCount = $_.Count
      }
  } | sort -desc Mem_MB | Select-Object -First 25
}
The code below will execute on Windows 7 and newer.
if ((Get-WmiObject win32_operatingsystem | select osarchitecture).osarchitecture -eq "64-bit") {
  #64 bit logic here
  get-process | Group-Object -Property ProcessName |
  % {
      [PSCustomObject]@{
          ProcessName = $_.Name
          Mem_MB = [math]::Round(($_.Group|Measure-Object WorkingSet64 -Sum).Sum / 1MB, 0)
          ProcessCount = $_.Count
      }
  } | sort -desc Mem_MB | Select-Object -First 25
} else {
  #32 bit logic here
  get-process | Group-Object -Property ProcessName |
  % {
      [PSCustomObject]@{
          ProcessName = $_.Name
          Mem_MB = [math]::Round(($_.Group|Measure-Object WorkingSet -Sum).Sum / 1MB, 0)
          ProcessCount = $_.Count
      }
  } | sort -desc Mem_MB | Select-Object -First 25
}64-bit or 32-bit machine / ps host / process
Various ways of determining if the system is 64-bit or 32-bit
[Source]
# Get the path where powershell resides.  If the caller passes -use32 then
# make sure we are returning back a 32 bit version of powershell regardless
# of the current machine architecture
function Get-PowerShellPath() {
    param ( [switch]$use32=$false,
            [string]$version="1.0" )

    if ( $use32 -and (test-win64machine) ) {
        return (join-path $env:windir "syswow64\WindowsPowerShell\v$version\powershell.exe")
    }

    return (join-path $env:windir "System32\WindowsPowerShell\v$version\powershell.exe")
}


# Is this a Win64 machine regardless of whether or not we are currently
# running in a 64 bit mode
function Test-Win64Machine() {
    return test-path (join-path $env:WinDir "SysWow64")
}

# Is this a Wow64 powershell host
function Test-Wow64() {
    return (Test-Win32) -and (test-path env:\PROCESSOR_ARCHITEW6432)
}

# Is this a 64 bit process
function Test-Win64() {
    return [IntPtr]::size -eq 8
}

# Is this a 32 bit process
function Test-Win32() {
    return [IntPtr]::size -eq 4
}

function Get-ProgramFiles32() {
    if (Test-Win64 ) {
        return ${env:ProgramFiles(x86)}
    }

    return $env:ProgramFiles
}

function Invoke-Admin() {
    param ( [string]$program = $(throw "Please specify a program" ),
            [string]$argumentString = "",
            [switch]$waitForExit )

    $psi = new-object "Diagnostics.ProcessStartInfo"
    $psi.FileName = $program
    $psi.Arguments = $argumentString
    $psi.Verb = "runas"
    $proc = [Diagnostics.Process]::Start($psi)
    if ( $waitForExit ) {
        $proc.WaitForExit();
    }
}

# Run the specified script as an administrator
function Invoke-ScriptAdmin() {
    param ( [string]$scriptPath = $(throw "Please specify a script"),
            [switch]$waitForExit,
            [switch]$use32=$false )

    $argString = ""
    for ( $i = 0; $i -lt $args.Length; $i++ ) {
        $argString += $args[$i]
        if ( ($i + 1) -lt $args.Length ) {
            $argString += " "
        }
    }

    $p = "-Command & "
    $p += resolve-path($scriptPath)
    $p += " $argString"

    $psPath = Get-PowershellPath -use32:$use32
    write-debug ("Running: $psPath $p")
    Invoke-Admin $psPath $p -waitForExit:$waitForExit
}Installed software via PowerShell
Shorter version
Get-ItemProperty -Path "HKLM:\Software\WOW6432Node\Microsoft\Windows\CurrentVersion\Uninstall\*", "HKLM:\Software\Microsoft\Windows\CurrentVersion\Uninstall\*", "HKCU:\Software\Microsoft\Windows\CurrentVersion\Uninstall\*" | Where-Object { $_.DisplayName -ne $null } | Select-Object DisplayName, DisplayVersion, InstallDate | Sort-Object -Property DisplayNameQuery registry for installed software
There's more data in each registry than is being displayed in the PowerShell Custom Objects output be the script below. You can inspect $InstalledSoftware for further details.
# HKEY_Local_Machine
$HKLM_InstalledSoftware = Get-ChildItem "HKLM:\Software\Microsoft\Windows\CurrentVersion\Uninstall"
$HKLM_PrettyList = foreach ($obj in $HKLM_InstalledSoftware) {
  [PSCustomObject]@{
    Name = ($obj.Name).Split('\')[-1]
    DisplayName = $obj.GetValue('DisplayName')
    DisplayVersion = $obj.GetValue('DisplayVersion')
    Publisher = $obj.GetValue('Publisher')
    InstallLocation = $obj.GetValue('InstallLocation')
  }
}
$HKLM_PrettyList | Sort-Object -Property Publisher,Name | Select-Object -Property DisplayName,Publisher,InstallLocation,Name
The above information does not include software installed to the current logged in user. Just change the hive that's being queried as shown below:
# HKEY_Current_User
$HKCU_InstalledSoftware = Get-ChildItem "HKCU:\Software\Microsoft\Windows\CurrentVersion\Uninstall"
$HKCU_PrettyList = foreach ($obj in $HKLM_InstalledSoftware) {
  [PSCustomObject]@{
    Name = ($obj.Name).Split('\')[-1]
    DisplayName = $obj.GetValue('DisplayName')
    DisplayVersion = $obj.GetValue('DisplayVersion')
    Publisher = $obj.GetValue('Publisher')
    InstallLocation = $obj.GetValue('InstallLocation')
  }
}
$HKCU_PrettyList | Sort-Object -Property Publisher,Name | Select-Object -Property DisplayName,Publisher,InstallLocation,Name
TCP/IP Reset
WiFi adapter sees available network, however will not accept tcp/ip address. Attempting to reset winsock and ip stack may resolve the problem. Note, this information is one of many possible solutions that should only be attempted if you have a good working knowledge of the Windows OS network settings and services.
- Open a command prompt using the Run As Administrator option.
- Run the following commands individually in the listed order.
netsh winsock reset
netsh int ip reset
ipconfig /release
ipconfig /renew
ipconfig /flushdns
Teams
Busy on busy during calls
- InboundPstnCallRoutingTreatment must be set to something other than "Use default settings" in order for BusyOnBusyEnabledType to be honored at all.
- The GUI "Let users decide" is the equivalent of the PowerShell "UserOverride"
PS C:\> Get-CSTeamsCallingPolicy -Identity Global

[Output edited to show pertinent information]

Identity                             : Global
BusyOnBusyEnabledType                : UserOverride
InboundPstnCallRoutingTreatment      : UserOverride
How to stop Aftershokz / Shokz headphones from beeping while muted
While Teams is muted, hold both VOLUME buttons (volume "+" and "-" at the same time) for about 3 seconds. You will hear MUTE OFF.
Transitioning from old to new
IPv4 ARP -> IPv6 Neighbors
netsh interface ipv6 show neighbors# OUTPUT:
Interface 16: Wi-Fi
Internet Address Physical Address Type
- - - - - - - - - - - - - - - - - - - -
fe80::2a80:88ff:efcd:8a41 28-80-88-dc-6a-41 Reachable(Router)ipconfig -> PowerShell
Get-NetIPAddress

Get-NetIPAddress | Select-Object -Property InterfaceAlias,IPAddress

Get-NetIPConfiguration | Select-Object -Property InterfaceAlias,IPv4Address
Local admin rights
# This is the actual PowerShell command, however I have yet to see it run successfully:
Get-LocalGroupMember -Group Administrators

# This is the legacy command that works just fine:
net localgroup administrators

# To add an AzureAD user to the local administrators group:
net localgroup administrators AzureAD\[USERNAME] /add
#end
Useful MSSQL Queries
Show running queries
SELECT req.session_id,
req.status,
req.command,
req.cpu_time,
req.total_elapsed_time,
sqltext.TEXT
FROM sys.dm_exec_requests req
CROSS APPLY sys.dm_exec_sql_text(sql_handle) AS sqltext
Kill running query
Get the session_id from the previous query, then use the KILL command:
KILL [session_id]
#end
Sysinternals
The Sysinternals web site was created in 1996 by Mark Russinovich to host his advanced system utilities and technical information. Whether you’re an IT Pro or a developer, you’ll find Sysinternals utilities to help you manage, troubleshoot and diagnose your Windows and Linux systems and applications.
Sysinternals Suite
$URL = "https://download.sysinternals.com/files/SysinternalsSuite.zip"
$OutFile = "C:\Scripts\Sysinternals\SysinternalsSuite.zip"
$OutPath = Split-Path -Path $OutFile

if (-not (Test-Path -Path $OutPath)) {
        New-Item -Path $OutPath -ItemType Directory
        Write-Output "Target folder $($OutPath) has been created."
}

Invoke-WebRequest -URI $URL -OutFile $OutFile
Expand-Archive -Path $OutFile -DestinationPath $OutPath
PsTools Suite
$URL = "https://download.sysinternals.com/files/PSTools.zip"
$OutFile = "C:\Scripts\Sysinternals\PSTools.zip"
$OutPath = Split-Path -Path $OutFile

if (-not (Test-Path -Path $OutPath)) {
        New-Item -Path $OutPath -ItemType Directory
        Write-Output "Target folder $($OutPath) has been created."
}

Invoke-WebRequest -URI $URL -OutFile $OutFile
Expand-Archive -Path $OutFile -DestinationPath $OutPath
Curated list
These are the ones that I use the most.
$DownloadPath = "C:\Scripts"
$SysinternalsFiles = @(
	"procexp.chm",
	"procexp.exe",
	"procexp64.exe",
	"procmon.exe",
	"psexec.exe",
	"pslist.exe",
	"psservice.exe",
	"tcpview.chm",
    "tcpview.exe",
    "tcpview64.exe"
)

if (-not (Test-Path -Path $DownloadPath)) {
    New-Item -Path $DownloadPath -ItemType Directory
    Write-Output "Target folder $($DownloadPath) has been created."
}

foreach ($AppFile in $SysinternalsFiles) {
	Write-Output "$($AppFile)"
    $outputFile = "$($DownloadPath)\$($AppFile)"
    $URL = "https://live.sysinternals.com/$AppFile"
    if (Test-Path -Path $outputFile) {
        Remove-Item $outputFile
        Write-Output "   - deleted existing"
    }
    Write-Output "   - downloading"
    Invoke-WebRequest -URI $URL -OutFile $outputFile
    Write-Output "   - done"
}
-end
Power Automate
Teams webhook requests for Mezmo Alerts
Mezmo Webhook configuration
Content-Type: application/json{
"title": "Mezmo - User account alert",
"summary": "{{ matches }} line(s) matched in {{ name }}",
"view": "{{ name }}",
"matches": "{{ matches }}",
"line": "{{ line }}",
"lines": "{{ lines }}",
"level": "{{ level }}",
"url": "{{ url }}",
"query": "{{ query }}",
"app": "{{ app }}",
"host": "{{ host }}",
"tag": "{{ tag }}"
}Teams Workflow
Using the default Teams Workflow that was created failed because evidently the suggested content from Mezmo wasn't correct. I'm sure there's a way to craft the message properly straight from the Mezmo configuration so you can use the default Teams Workflow, but I haven't figured it out yet.
Instead, I went down the path of customizing the workflow in Power Automate and leveraging Compose to create the card I wanted (or at least as close as I've been able to get so far) with the data I'm sending from Mezmo via the Webhook.
Power Automate Workflow Edit
The screenshot below is the basic workflow.
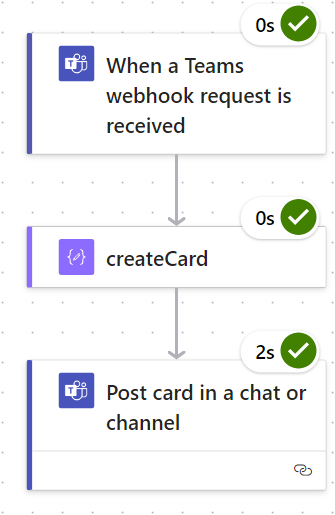
Compose: createCard
JSON Parameters
{
"$schema": "http://adaptivecards.io/schemas/adaptive-card.json",
"version": "1.4",
"type": "AdaptiveCard",
"body": [
{
"type": "TextBlock",
"size": "Medium",
"weight": "Bolder",
"id": "Title",
"text": "@{triggerBody()?['title']}"
},
{
"type": "FactSet",
"facts": [
{
"title": "Summary",
"value": "@{triggerBody()?['summary']}"
},
{
"title": "View",
"value": "@{triggerBody()?['view']}"
},
{
"title": "Host",
"value": "@{triggerBody()?['host']}"
},
{
"title": "Query",
"value": "@{triggerBody()?['query']}"
},
{
"title": "Severity",
"value": "@{triggerBody()?['level']}"
}
]
},
{
"type": "TextBlock",
"id": "Line",
"text": "Line: @{triggerBody()?['line']}",
"wrap": true
},
{
"type": "Container",
"items": [
{
"type": "TextBlock",
"text": "Click to see all lines",
"weight": "Bolder",
"size": "Medium",
"color": "Accent"
},
{
"type": "ActionSet",
"actions": [
{
"type": "Action.ToggleVisibility",
"title": "Show Details",
"targetElements": [
"AllLinesExpanded"
]
}
]
},
{
"type": "Container",
"id": "AllLinesExpanded",
"isVisible": false,
"items": [
{
"type": "TextBlock",
"text": "@{triggerBody()?['lines']}",
"wrap": true
}
]
}
]
},
{
"type": "TextBlock",
"id": "URL",
"text": "[Link to logs](@{triggerBody()?['url']})",
"wrap": true
}
]
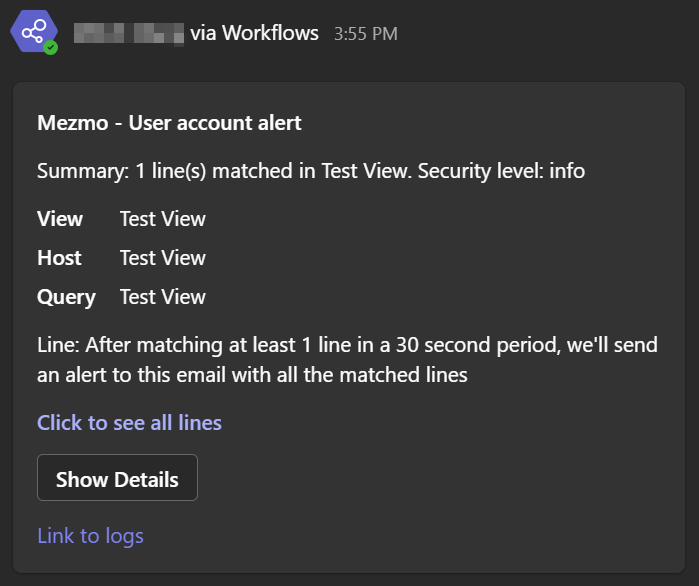
}Resulting Teams Card
-end
Microsoft Remote Desktop
Select RDP transport protocols (client side)
Check
Get-ItemProperty -Path "HKLM:\SOFTWARE\Policies\Microsoft\Windows NT\Terminal Services" -Name "SelectTransport""Use only TCP"
Set-ItemProperty -Path "HKLM:\SOFTWARE\Policies\Microsoft\Windows NT\Terminal Services" -Name "SelectTransport" -Value 1 -Type DWord"Use both UDP and TCP"
Set-ItemProperty -Path "HKLM:\SOFTWARE\Policies\Microsoft\Windows NT\Terminal Services" -Name "SelectTransport" -Value 0 -Type DWord"Use either UDP or TCP"
Set-ItemProperty -Path "HKLM:\SOFTWARE\Policies\Microsoft\Windows NT\Terminal Services" -Name "SelectTransport" -Value 2 -Type DWordPowerShell Modules
PowerAruba
PowerArubaSW - PowerShell module to manage ArubaOS switches
Microsoft 365 Licensing
Microsoft wireless network report
Collecting information related to interpreting the Microsoft WLANREPORT
netsh wlan show wlanreport
Microsoft: Answers to common questions about NCSI (Network Connectivity Status Indicator)
Reasons for network probe failure
| Output | Description |
|---|---|
| ActiveDnsProbeFailed | The DNS probe failed. Verify via a packet capture. |
| ActiveHttpProbeFailed | The DNS name for the probe server wasn’t resolved. NSCI failed before attempting to send the web probe request. This could be due to DNS failure, failure to connect to the proxy server, etc. Verify via a packet capture. |
| ActiveHttpProbeFailedButDnsSucceeded | The probe server DNS name was resolved but the HTTP probe to that resolved IP address failed. Use a packet capture application and verify the data capture. |
| ActiveHttpProbeFailedHotspotDetected | The HTTP probe didn’t get past a hotspot or captive portal. This is typically determined when an HTTP response 200 is received, but the response payload doesn’t contain the text file connecttest.txt. Alternatively, a non-200 HTTP status code, such as 302 or 304, might be received. This status code will normally be observed when handling issues where the wireless connection cannot be established. Verify via a packet capture. The user may need to authenticate the hotspot or the hotspot configuration may need to be modified. |
| NoAddress | The target adapter has no preferred IP address assigned. There is a bigger issue involved that can't be resolved through NSCI. |
| NoGlobalAddress | Same as NoAddress but specific to IPV6 interfaces. |
| NoRoute | The interface that the probe is being sent on has no route to the internet in the routing table. Some scenarios where this can happen is when a newly connected VPN hasn’t yet changed the routing table with new routes, or in forced tunnel VPN scenarios in which after the VPN interface is connected, the physical interface drops to local connectivity as the route table was modified. |
| PassivePacketHops | Not a failure. Received packets indicate some level of connectivity. This change reason is used when capability is being raised, not lowered. |
-end
PKI
Articles
-end